Showing posts with label Kubuntu. Show all posts

Monday, May 10, 2010

Japanese Input in Lucid Lynx (Kubuntu 10.04)

Introduction

Since Kubuntu 9.10 there is a movement to replace skim [1] with ibus [2] that seems to be a better alternative. Unfortunately after my latest upgrade to Kubuntu 10.04 this movement caused my Japanese input to stop working.

To get Japanese working again using ibus was actually very easy and here Iexplain the steps to do it.

Uninstall SCIM/SKIM packages

First we uninstall all SCIM and SKIM related packages to avoid any kinds of conflicts with the new iBus system.


Install iBus required packages


Second we install the iBus packages needed to support different language input methods.


Configure the system to auto-select the input method.

The im-switch utility is used to select input methods. For better results make sure you select auto.


Trouble Shooting


  • Japanese/Chinese/Korean/etc does not work in any applications.
  • Make sure you have all scim/skim related packages uninstalled and all required ibus packages installed. Also make sure you ran the im-switch command (with sudo) and set ibus in auto mode.
  • Japanese/Chinese/Korean/etc input work in KDE apps but no in GTK (Firefox, Chrome, Skype) apps!
  • This happens if you do not have the ibus-gtk module installed or do not set the im-switch to auto.
  • Japanese/Chinese/Korean/etc input work in GTK (Firefox, Chrome, Skype) apps but no in KDE apps!
  • This happens if you do not have the ibus-qt4 module installed or do not set the im-switch to auto.

Resources

[1] http://www.scim-im.org scim/skim
[2] http://code.google.com/p/ibus

Sunday, January 03, 2010

Brother DCP-595CN Printer In Ubuntu/Kubuntu


This little machine is a printer, scanner and copy machine all in one. It has USB and ethernet ports but even better a wireless 802.11a/b/g port. This means I can have the printer anywhere in the house and print from my desktop or lapton freely. In Japan it costs around ¥15,000 (USD 150) that is pretty cheap for all the features packaged in.

And the most important thing for me is that is 100% compatible with linux (Kubuntu). Here I will show the steps to get this little beast working with my Kubuntu machine.

Prerequisites


I use the wireless interface to connect to the printer/scanner so before you follow these instructions make sure the printer has an IP configured. The wireless configuration is done using the printer control panel and is already covered in the printer manual so I will skip it.

You may ping the printer IP address to check that you can reach it from your computer. If you cannot ping it then it is not well configured or you have problems with your LAN network.

Installation


These instructions are based on the Brother solution page instructions.

First we need to download both the LPR driver and the CUPS wrapper driver by going to the following URLs. Inside you will find RPM and DEB packages for the different printer models.

If you have the same printer as me (DCP-595CN) then look for the DEB packages of this printer and click the link. You will be directed to a GPL license page where you must agree to the GPL terms (Left Button) after which the download will start.

Once the DEB packages are downloaded we install them using the following commands:

sudo mkdir /usr/share/cups/model
sudo mkdir /var/spool/lpd
sudo mkdir -p /usr/lib/cups/filter
sudo dpkg -i dcp595cnlpr-1.1.2-1.i386.deb
sudo dpkg -i dcp595cncupswrapper-1.1.2-2.i386.deb
note that there are only packages for i386 architectures but if you see the Q&A link they explain how to install on amd64 architectures. All you have to do is add the --force-arquitecture switch to the dpkg command like:
sudo dpkg --force-arquitecture -i dcp595cnlpr-1.1.2-1.i386.deb
sudo dpkg --force-arquitecture -i dcp595cncupswrapper-1.1.2-2.i386.deb

Now with the drivers installed we can use the CUPS administration page to add the printer. To do this we open our favorite Internet browser and access the following URL: http://localhost:631.

Enter the printer administration tab and add a new printer. If your printer is already configured with an IP address in your LAN it should appear in the list of detected printers (see screenshot below):


Select the printer and in the next window you will be asked to add some details about the printer like the place, description and name. You may add anything you like or leave the defaults and go to the next screen.

In the next screen (see screenshot below) we select the printer driver to use. If you installed the DEB packages correctly then the correct driver should be selected here by default:


Simply press the "add printer" button to finish. Now your printer should be ready for printing. Go ahead the print something.

Brother DCP-595CN Scanner In Ubuntu/Kubuntu


Getting the scanner working in Kubuntu is even easier. First we need to download the SANE driver from Brothers home page. Which driver to download depends on the scanner model you have. In my case (DCP-595CN) I need the brscan3 driver. There are 32 and 64bit versions and RPM and DEB packages. For my configuration I need the brscan3 32bit DEB pacakge. Download the package for your configuration and install it using this command:

sudo aptitude install xsane sane-utils brscan3-0.2.8-1.i386.deb

In the command above I am installing some SANE packages and the brscan3 driver. Next we need to configure the scanner with the following command:

sudo brsaneconfig3 -a name=DCP-595CN model=DCP-595CN ip=192.168.11.4

Depending on the driver you installed the configuration command changes. For brscan3 we use the "brsaneconfig3" command. The name can be anything you want as long as it has no white spaces but the model and the ip must be set to the correct values. The ip of course is the IP address the printer has configured and the model is the model name of the printer. If you are not sure about the model or IP you can use the following command to query the network:

sudo brsaneconfig3 -q

This command gives a list of supported models and at the end a list of detected scanners. In my configuration at the end I get:

Devices on network
0 DCP-595CN           "DCP-595CN"         I:192.168.11.4


If you do not see this list then your machine is not able to reach the scanner on the IP level so make sure it has the IP address configured and that you can ping it.

After you have configured the scanner with the brscanconfig3 tool you are ready to scan. To test it you can run xsane and the scanner should be listed like in the screenshot below:


Select the scanner and scan something. Now you have a fully functional printer, scanner and copy machine in you Kubuntu installation.

Sunday, December 27, 2009

Synchronizing two machines

Synchronizing two machines                                                                                                                                                                                                                      
                                                                                                                                                                                                                                                                               
  Introduction                                                                                                                                                                                                                                 
                                                                                                                                                                                                                                                                               
    The method I document here shows how I use unison in combination with                                                                                                                                                                        
    incrontab to keep some folders shared between my work and home machines in                                                                                                                                                                   
    sync almost in real time.                                                                                                                                                                                                                    
                                                                                                                                                                                                                                                                               
  Background                                                                                                                                                                                                                                   
                                                                                                                                                                                                                                                                               
    This is only a rant so you can skip this if you are in a hurry.                                                                                                                                                                              
                                                                                                                                                                                                                                                                               
    Before this setup I had a cron job with a rsync task to sync my shared                                                                                                                                                                       
    folders. The problem is that rsync is one-way sync tool and works well                                                                                                                                                                       
    when you have a master machine where you add/modify/delete files and then                                                                                                                                                                    
    rsync one or more slave machines to the master. In my case I have two                                                                                                                                                                        
    machines that are both master and changes on any of them have to be                                                                                                                                                                          
    propagated to the other.  Of course this master-master configuration can                                                                                                                                                                     
    be done with rsync but you really MUST be very careful on what order you                                                                                                                                                                     
    sync (e.g.  from A to B or from B to A) when you use the --delete switch                                                                                                                                                                     
    (see [1] and [2] fpr details). Not using the --delete switch means that no                                                                                                                                                                   
    file in those machines will ever be deleted unless you manually delete the                                                                                                                                                                   
    file from both sides.  I have been using rsync with a crob job for years                                                                                                                                                                     
    but a few months ago I was victim of the --delete switch. Looking for                                                                                                                                                                        
    alternatives I found unison that does the master-master configuration                                                                                                                                                                        
    amazingly well and at the same time I found about incrontab. Both unison                                                                                                                                                                     
    and incrontab together resulted in a very good setup that I will now                                                                                                                                                                         
    document in the rest of this post.                                                                                                                                                                                                           
                                                                                                                                                                                                                                                                               
  Two way sync of two machines (master-master backup)                                                                                                                                                                                          
                                                                                                                                                                                                                                                                               
    Unison will keep two machines in sync taking care of the --delete flag for                                                                                                                                                                   
    us and even has an option to keep several days of backups of any file it                                                                                                                                                                     
    deletes so you can check once a week if it deleted a file you did not want                                                                                                                                                                   
    deleted.                                                                                                                                                                                                                                     
                                                                                                                                                                                                                                                                               
    To install unison in (K)Ubuntu we simply do:                                                                                                                                                                                                 
                                                                                                                                                                                                                                                                               
    ; sudo aptitude install unison                                                                                                                                                                                                                
                                                                                                                                                                                                                                                                               
    Note that unison MUST be installed in the two machines you want to keep in                                                                                                                                                                   
    sync. As additional bonus this tool works in all major operating systems                                                                                                                                                                     
    so you can sync your work and home machines even if you use Windows at                                                                                                                                                                       
    work and Linux at home.                                                                                                                                                                                                                      
                                                                                                                                                                                                                                                                               
    Now to sync some folders between machines you issue a simple command:                                                                                                                                                                        
                                                                                                                                                                                                                                                                               
    ; unison /home/user ssh://<ipaddress>//home/user      \                                                                                                                                                                                 
    ; -path .vim -path .vimrc -path .muttrc -path .mutt   \                                                                                                                                                                                       
    ; -path Music -path Photos -path Docs                                                                                                                                                                                                         
                                                                                                                                                                                                                                                                               
    In the above example I sync my vim, mutt configuration files and my Music,                                                                                                                                                                   
    Photos and Docs folders in my home directory. Replace the ipaddress with                                                                                                                                                                     
    the address of the remote machine and note that the double slash (//)                                                                                                                                                                        
    after the ipaddress is not a typo, you MUST have two slashes there when                                                                                                                                                                      
    using absolute paths in the remote side.                                                                                                                                                                                                     
                                                                                                                                                                                                                                                                               
    This command can be executed in any of the two machines and the result                                                                                                                                                                       
    will be the same. Both of them will have the directories selected (-path)                                                                                                                                                                    
    syncrhonized to the last detail.                                                                                                                                                                                                             
                                                                                                                                                                                                                                                                               
    Since I use ssh as transport I also set up my machines to authenticate                                                                                                                                                                       
    using ssh keys and configure Kwallet [3] as my ssh passphrase manager.                                                                                                                                                                       
    This is very important if we want to automate the task via cron or incron                                                                                                                                                                    
    jobs as I show later in this post.                                                                                                                                                                                                           
                                                                                                                                                                                                                                                                               
    To simplify the synchronization task I created a small bash script that                                                                                                                                                                      
    loads my ssh key manager (keychain), executes unison to synchronize my                                                                                                                                                                       
    machines while logging everything to /tmp/unison.log. 
    <SCRIPT                                                                                                                                                                                                                                 
    < #!/usr/bin/env bash                                                                                                                                                                                                                   
    < LOGGER=/usr/bin/logger                                                                                                                                                                                                                
    < UNISON=/usr/bin/unison                                                                                                                                                                                                                
    < KEYCHAIN=/usr/bin/keychain                                                                                                                                                                                                            
    < $LOGGER -t unison -p cron.info "Unison started for user $HOME"                                                                                                                                                              
    < if [ -e /tmp/unison.lock ]                                                                                                                                                                                                            
    < then                                                                                                                                                                                                                                  
    <   $LOGGER -t unison -p cron.info "Unison already running... abort"                                                                                                                                                          
    < else                                                                                                                                                                                                                                  
    <   echo "running" > /tmp/unison.lock                                                                                                                                                                                      
    <   $KEYCHAIN id_rsa                                                                                                                                                                                                                    
    <   source $HOME/.keychain/$HOSTNAME-sh                                                                                                                                                                                                 
    <   $UNISON $HOME ssh://192.168.1.10/$HOME -batch -log -logfile /tmp/unison.log \                                                                                                                                                       
    <                           -path .vim -path .vimrc -path .muttrc -path .mutt   \                                                                                                                                                       
    <                           -path Music -path Photos -path Docs                                                                                                                                                                         
    <   [ $? -eq 0 ] && $LOGGER -t unison -p cron.info "Unison finished" || $LOGGER -t unison -p cron.info "Unison failed with error $?"                                                                        
    <   rm -f /tmp/unison.lock                                                                                                                                                                                                              
    < fi                                                                                                                                                                                                                                    
                                                                                                                                                                                                                                                                               
  Using incrontab for almost real time two way file sync                                                                                                                                                                                       
                                                                                                                                                                                                                                                                               
    Now that I can sync my two machines with a simple script I wanted this to be                                                                                                                                                                 
    automated. The normal way would be using a cron job but a problem I always                                                                                                                                                                   
    had with cron was how to set the time period. Once an hour or a day or a                                                                                                                                                                     
    minute? While researching I found incrontab that is like cron but it reacts                                                                                                                                                                  
    to file system events. With it I could invoke my unison script every time a                                                                                                                                                                  
    file is created or edited that would result in almost real time sync between                                                                                                                                                                 
    my machines.                                                                                                                                                                                                                                 
                                                                                                                                                                                                                                                                               
    To install incrontab in (K)Ubuntu simply do:                                                                                                                                                                                                 
                                                                                                                                                                                                                                                                               
    ; sudo aptitude install incron                                                                                                                                                                                                                
    ; echo "username" >> /etc/incron.allow                                                                                                                                                                                        
                                                                                                                                                                                                                                                                               
    The first command installs incron and the second one adds your user name                                                                                                                                                                     
    to the list of allowed incron users. If your username is not in the                                                                                                                                                                          
    "incron.allow" file then you wont be able to use incrontab.                                                                                                                                                                        
                                                                                                                                                                                                                                                                               
    A common problem that happens when using rsync or unison from within cron                                                                                                                                                                    
    and incron is how to handle the authentication of the ssh session.                                                                                                                                                                           
    Remember that the cron and incron processes are running in a different                                                                                                                                                                       
    environment as your user so setting a key manager like ssh-agent or                                                                                                                                                                          
    keychain in the current user termial wont work. If you have ever had rsync                                                                                                                                                                   
    work perfectly from a terminal but fail with an error like: unexplained                                                                                                                                                                      
    error (code 255) then you know what I am talking about.                                                                                                                                                                                      
                                                                                                                                                                                                                                                                               
    To solve this problem you first need to set your machines to use                                                                                                                                                                             
    password-less ssh key authentication. This way you can execute remote                                                                                                                                                                        
    commands via ssh without need to input a password.                                                                                                                                                                                           
                                                                                                                                                                                                                                                                               
    Second you need to setup a keymanager like ssh-agent or keychain. I found                                                                                                                                                                    
    that keychain does a better job in keeping a single instance of itself to                                                                                                                                                                    
    handle the keys on multiple processes. So I setup keychain and configure                                                                                                                                                                     
    Kwallet [3] as the interface that asks and stores the ssh pashphrases.                                                                                                                                                                       
    With this setup Kwallet asks me to unlock it at KDE startup and from that                                                                                                                                                                    
    point on it takes care of providing authentication to all processes that                                                                                                                                                                     
    require ssh loging (incrontab included).                                                                                                                                                                                                     
                                                                                                                                                                                                                                                                               
    Once you have setup the key manager you can create an incrontab rule to                                                                                                                                                                      
    invoke the unison script (from the previous section) every time a file is                                                                                                                                                                    
    changed:                                                                                                                                                                                                                                     
                                                                                                                                                                                                                                                                               
    ; incrontab -e                                                                                                                                                                                                                                
                                                                                                                                                                                                                                                                               
    This command will open you text editor (vim) with your user's incrontab                                                                                                                                                                      
    configuration file. All you have to do is to input the following line and                                                                                                                                                                    
    save/close the editor:                                                                                                                                                                                                                       
                                                                                                                                                                                                                                                                               
    ; /home/user IN_ATTRIB,IN_DONT_FOLLOW,IN_NO_LOOP /home/user/unison.sh                                                                                                                                                                         
                                                                                                                                                                                                                                                                               
    This incrontab rule invokes "unison.sh" every time an attribute changes in                                                                                                                                                         
    a file or folder inside my home directory. The IN_ATTRIB switch may be                                                                                                                                                                       
    overkill and you may prefer to use IN_CREATE or IN_CLOSE_WRITE. For                                                                                                                                                                          
    details on incrontab switches you may read the man page:                                                                                                                                                                                     
                                                                                                                                                                                                                                                                               
    ; man 5 incrontab 

    This command will open you text editor (vim) with your user's incrontab                                                                                                                                                                      
    configuration file. All you have to do is to input the following line and                                                                                                                                                                    
    save/close the editor:                                                                                                                                                                                                                       
                                                                                                                                                                                                                                                                               
    ; /home/user IN_ATTRIB,IN_DONT_FOLLOW,IN_NO_LOOP /home/user/unison.sh                                                                                                                                                                         
                                                                                                                                                                                                                                                                               
    This incrontab rule invokes "unison.sh" every time an attribute changes in                                                                                                                                                         
    a file or folder inside my home directory. The IN_ATTRIB switch may be                                                                                                                                                                       
    overkill and you may prefer to use IN_CREATE or IN_CLOSE_WRITE. For                                                                                                                                                                          
    details on incrontab switches you may read the man page:                                                                                                                                                                                     
                                                                                                                                                                                                                                                                               
    ; man 5 incrontab                                                                                                                                                                                                                             
                                                                                                                                                                                                                                                                               
    The IN_NO_LOOP avoids the script from being invoked several times when                                                                                                                                                                       
    more than one file changes at a time. Also the script I provided uses a                                                                                                                                                                      
    simple lock mechanism to avoid it from running several times in parallel.                                                                                                                                                                    
                                                                                                                                                                                                                                                                               
    As a final note you can open /var/log/syslog and search for all entries                                                                                                                                                                      
    with the unison tag to see if the script is running correctly or failing.                                                                                                                                                                    
    If it is failing you can further chech the /tmp/unison.log file to see why                                                                                                                                                                   
    it is failing. Note that an abort is not an error, it means that then                                                                                                                                                                        
    unison script was invoked several times in succession and we only allow                                                                                                                                                                      
    one instance at any given time.                                                                                                                                                                                                              
                                                                                                                                                                                                                                                                               
  Resources                                                                                                                                                                                                                                    
                                                                                                                                                                                                                                                                               
    [1] http://www.darcynorman.net/2006/10/03/be-careful-with-rsync-delete/                                                                                    
    [2] http://www.davidgrant.ca/rsync_delete_dangerous                                                                                                                            
    [3] http://piao-tech.blogspot.com/2009/12/manage-ssh-and-gpg-keys-efficiently-in.html                                                        

Thursday, October 09, 2008

Open new files as tabs in current Vim Console

When programming I like to have a single Vim editor open with all my files as tabs. Until now I was using the ":tabnew" command to open files in the current Vim window as I knew no other way.

Some research led me to the --remote-tab switch that allows to open files as tabs in currently open Vim processes but it seemed to work only with the graphical interface (gvim) and not with the console (vim). But as I made some tests I found this can work with the vim in console mode and more over can be nicely integrated with my favorite file managers (Konqueror/Dolphin).

All I needed to do was configure my bash so it will always start vim in server mode if it is not already and to always use the --remote-tab switch when opening files. To do this I simply added these functions to my ~/.bashrc file:


function v {

   if [ "$#" -eq "0" ]; then

      /usr/bin/vim --servername VIMLOCAL

   else

      if echo "$*" | grep -q -- "--servername" ; then

        # echo "Command already has --servername use it"

        /usr/bin/vim $*

      else

          #echo "Use default VIM server VIMLOCAL"

          /usr/bin/vim --servername VIMLOCAL --remote-tab-silent $*

      fi

   fi

}


function gv {

   if [ "$#" -eq "0" ]; then

      /usr/bin/gvim --servername GVIMLOCAL

   else

      if echo "$*" | grep -q -- "--servername" ; then

        # echo "Command already has --servername use it"

        /usr/bin/gvim $*

      else

          #echo "Use default VIM server VIMLOCAL"

          /usr/bin/gvim --servername GVIMLOCAL --remote-tab-silent $*

      fi

   fi

}


alias vi=v

alias vim=v

alias gvim=gv


With these functions loaded (i.e. source ~/.bashrc) the first time you execute vim/gvim it will start a new process in server mode.


# this command will open vim in the current console
# and display first_file.txt for editing.

vim first_file.txt


The second and all subsequent times you execute vim/gvim the files you set as parameters will be opened as tabs in the already opened vim/gvim instance.


# This command in other console will open the files
# second_file.txt and third_file.txt as tabs in the
# other console with first_file.txt open

vim second_file.txt third_file.txt


The above examples work also with gvim instead of vim. The only drawback is that now it is difficult to open files in a separate console. The best solution I found is to call vim with a different server name:


# This command will create a new instance of vim in the current console window
# and display the other_file.txt file for editing.

vim --servername OTHERNAME other_file.txt


If you prefer not to use tabs and like files to be opened as buffers inside a current running Vim instance then simply replace "--remote-tab-silent" with "--remote-silent" in the above scripts.

Make Vim and Ctag play nice together


The classic tutorial of Ctags + Vim will go something like:

  • - Install exuberant ctags

  • - Generate tags for your project

  • - Also install the tag list plugin

  • - Use ^] and ^T to jump around the code


In this post I will try to go a little further and show how I manage tags in vim for real and large C projects.

Note that I mostly program in C (not C++), Ruby and Bash so I cannot guarantee my method works for all languages. In special Ctags has problems supporting C++. On the other side I have worked in small projects in Java and Python and I had no problems navigating them with my method.

Pre requisites


The following instructions were tested on a Linux machine installed using Kubuntu 8.10, 9.04 and 9.10. The first step is of course to make sure you have installed Vim and exuberant-ctags in you machine:


sudo aptitude install vim-ruby vim-scripts vim-common exuberant-ctags


If you are new to Vim then you should take some time to set your minimal configuration. You may follow mine if you want link.

Generate system wide ctags


All large projects will use at some point external libraries. My C projects usually use the Linux/FreeBSD system calls, SDL, OpenGL, libavcodec and libavformat among others.

To be able to jump to these libraries we must generate tags for each of them. I usually generate them inside my vim directory but you may create them in a system wide folder.

This is extremely useful to easily find out the members of libavcodec large structs or to quickly find out what are the arguments of SDL functions or system calls.

Ctags for Linux System Calls


mkdir -p ~/.vim/tags
sudo aptitude install linux-headers-`uname -r`
ctags -R -f ~/.vim/tags/kerneltags /usr/src/linux-headers-`uname -r`


Ctags for Ruby core and gem libraries


mkdir -p ~/.vim/tags
ctags -R -f ~/.vim/tags/rbtags /usr/lib/ruby


Ctags Java libraries


# For the java tags to work you need to install java source package.
# In Kubuntu/Ubuntu follow these instructions:
mkdir -p ~/.vim/tags
sudo aptitude install sun-java6-source
sudo mkdir -p /usr/lib/jvm/java-6-sun/src
sudo unzip -d /usr/lib/jvm/java-6-sun/ /usr/lib/jvm/java-6-sun/src.zip
ctags -R -f ~/.vim/tags/javatags /usr/lib/jvm/java-6-sun/src


At this you should be able to create tags for all the libraries you use in your projects. Simply get the source code or development packages of the library and run ctags on the folder that contains the source code and save the tags in a file you can access.

TODO: I really need to research what are the best ctags flags for each language in order to generate the most information possible per tag.

Updating your system wide ctags


Here we have three options:

  • Update your system/library tags manually each time you upgrade them

  • Use a cron job to update them every certain period of time (e.g. once a week).

  • Use incrontab to monitor changes in the system/library folders and automatically update the tags every time these folders change.


Personally I use the cron job method and for some libraries that I update often (e.g. libavcodec from subversion) I manually generate the tags soon after I update the library.

I found about incrontab just recently and I think will be the best way to update system wide tags. It behaves mostly like crontab but instead of triggering actions based on time periods it triggers by file system events like file change, move, save, etc. It should be easy to monitor the folders containing the libraries of interest and regenerate the tags for each library based on change events in the folder contents. The tricky part would be to determine what file system event we must listen to decide if we should regenerate or not the tags.

Generating ctags for your own libraries/projects


Now we need to generate tags for projects/libraries we are developing at the moment. These projects are constantly changing so we need to update them as soon as possible.

This is a common problem that lot's of people solve in different ways. See for example these links:


Most methods I found do the same more or less: they set some auto commands to autogenerate tag files when a file is edited and set the search path in a way it can find the generated tags.

I used to have some autocommands in vim to generate tags every time I modified a file in a project. Unfortunately I never figured out how to generate a single tags file per project/library. I always ended with a global tag file for all projects or a single tag file per folder.

Another methods worked by adding tags generation commands to the build system so the tags get generated when we recompile the project (e.g. Makefile, Ant, CMake) and others simply created scripts per project and executed them manually from the project root directory or within vim using a key map.

Since I use the Project.vim plugin it is natural for me to use it to generate the tags files as it is done here. My method is a lot different in that I do not use a Makefile to generate the tags and I only re-generate them when a file has been edited, not every time we open a file.

Auto-generating Ctags Using the Project.vim plugin


Anyone that has used the Project.vim plugin is familiar with the snippet shown below:


myproj=<src-path> in=in.vim out=out.vim CD=<src-path> {
CMakeLists.txt
in.vim
out.vim
include-----------------
src---------------------
test--------------------
tools-------------------
}


This corresponds to a project entry called "myproj" with root directory set to "src-path". Here the important parts are the "in", "out" and "CD" parameters.

The "CD" parameter makes sure that you are at the project root directory when editing a file from that project. This is useful to have a single tags file per project.

The "in" and "out" parameters are simple vim scripts. The "in" script is executed when opening a file from the project and the "out" script when leaving the file. In these scripts is where I set/unset the autocommands that take care of generating the tags files per project.

Every time I create a new project using the Project.vim plugin I also create these in.vim and out.vim scripts:

in.vim


" let ctags_cmd='/usr/local/bin/exctags'   " Use this one in FreeBSD

let ctags_cmd='/usr/bin/ctags'             " Use this one in Linux

let proj_path = escape(getcwd(), ' ')

let _ctagargs_ = " --fields=+iaS --extra=+q -R "

let _ctag_ = ctags_cmd . _ctagargs_ . " -f " . proj_path . "/.tags " . proj_path

au BufWritePost <buffer> call system(_ctag_)


out.vim


au! * <buffer>


Now every time you open a file from a project an autocommand will be created for that file that will regenerate tags for the whole project every time the file is saved. The generated tags file is always in the root directory of the project. You may prefer to use the "--append" switch of ctags to generate tags for the current file only but I personally prefer regenerating the tags of the whole project every time.

When you leave the file the autocommand is removed in the out.vim script. If we do not remove the autocommand, it will be created every time we enter the file that results in a lot of autocommands around. I am not really sure if this can cause problems but is better go on the safe side.

Now the last piece of the puzzle is how to tell Vim where to search for the tags.

Tell Vim where to search for tags


To find the per project tags we can simply add this to our vimrc file:


set tags=./.tags;${HOME}


This simple command tells vim to search tag files from the current directory backwards up to our $HOME directory. Since we are sure that we are always at the projects root directory where the tags file is automatically generated we can be sure that vim will always find the tag we are looking for.

There are some system wide tags that we want to always load depending on the language we are developing. For example when I develop in C I would like to have the kernel system calls tag file (that we generated before) or when developing in Ruby/Java I expect to have these languages core tags loaded too.

To do this I load all system wide libraries based on filetype using these commands in my vimrc file:


au BufRead,BufNewFile *.rb setlocal tags+=~/.vim/tags/rbtags

au BufRead,BufNewFile *.cpp,*.h,*.c setlocal tags+=~/.vim/tags/kerneltags

au BufRead,BufNewFile *.rl,*.def setlocal tags+=~/.vim/tags/kerneltags

au BufRead,BufNewFile *.py setlocal tags+=~/.vim/tags/pytags

au BufRead,BufNewFile *.java setlocal tags+=~/.vim/tags/javatags


What these commands do is to load the system wide tag files we generated before depending on the file type. For example when editing a ruby file it loads the Ruby tags file.

We must note that the commands only apply to the current file being edited (e.g. setlocal), not all the files in the project and that we are adding the tags file not replacing the current one (e.g. += ).

Finally how can we add other tag files to the project that are not from the project itself and not system wide?. For example my project requires external libraries like libavcodec and SDL so it would be nice to query the function and struct definitions of these libraries.

To do this I use the "in.vim" script of the Project.vim plugin like:


" let ctags_cmd='/usr/local/bin/exctags'   " Use this one in FreeBSD

let ctags_cmd='/usr/bin/ctags'             " Use this one in Linux

let proj_path = escape(getcwd(), ' ')

let _ctagargs_ = " --c++-kinds=+p --fields=+iaS --extra=+q -R "

let _ctag_ = ctags_cmd . _ctagargs_ . " -f " . proj_path . "/.tags " . proj_path

au BufWritePost <buffer> call system(_ctag_)


" Add external library tag files

setlocal tags+=~/.vim/tags/sdltags

setlocal tags+=~/.vim/tags/ffmpegtags


This is exactly the same "in.vim" script as above with two added lines that include the libavcodec (FFMpeg) and SDL library tags files to the search path of vim for all files in the project. These files were of course generated before the same way we created the system wide tag files and updated via a cron job.

Once you setup this once you don't need to worry about this anymore until you reinstall your computer. The system wide libraries will be always updated if you configured the corresponding cron jobs and once a project is created it will always have the tags files updated and ready to query.

Setting up the TagList Plugin


No blog post about Vim+Ctags is complete without the mighty TagList plugin. To install this plugin go to http://vim-taglist.sourceforge.net/ and download the taglist_45.zip file. Then add it to your vim installation using the command:

unzip -d ~/.vim taglist_45.zip

Then add these commands to your vimrc file:


" let Tlist_Ctags_Cmd='/usr/local/bin/exctags'   " Use this one in FreeBSD

let Tlist_Ctags_Cmd='/usr/bin/ctags'             " Use this one in Linux

let Tlist_Auto_Open=0

let Tlist_Auto_Update=1

let Tlist_Use_Horiz_Window = 0

"let Tlist_Inc_Winwidth=0

"let Tlist_Show_One_File=1

let Tlist_Exist_OnlyWindow=1

let Tlist_Use_Right_Window = 1

let Tlist_Sort_Type="name"

let Tlist_Display_Prototype=0

let Tlist_Compact_Format=1 " Compact?

let Tlist_GainFocus_On_ToggleOpen=1

let Tlist_Display_Tag_Scope=1

let Tlist_Close_On_Select=1

let Tlist_Enable_Fold_Column=1

"let TList_WinWidth=25


" Map a F8 to the TlistToggle command for easy tags list access

nnoremap <silent> <F8> <ESC>:TlistToggle<CR>


Of course I recommend you to read the help file and set the configuration as it fits you better. With my configuration you can press to open the tags list window and when you press on a tag the windows automatically closes. This is specially useful on small screen laptops to allow more code visible all the time.

Wednesday, October 08, 2008

Basic .vimrc file


My first Vim configuration files: .vimrc, plugins, color schemes, etc were very small and modest. It's been eight years since I started using Vim and these configuration files have morphed, evolved, grown and recently shrink in too many ways, more than I can remember, and every time I check www.vim.org I find new ways I would like my Vim to evolve even further.

Here is the simplest version of my .vimrc file with no ctags or desktop integration as these topics require a separate post to explain. Most of the options here can be understood directly from Vim help files and by the comments in the file itself.

If you would like to use this file make sure to copy it in your home directory and read the comments as to get full functionality.

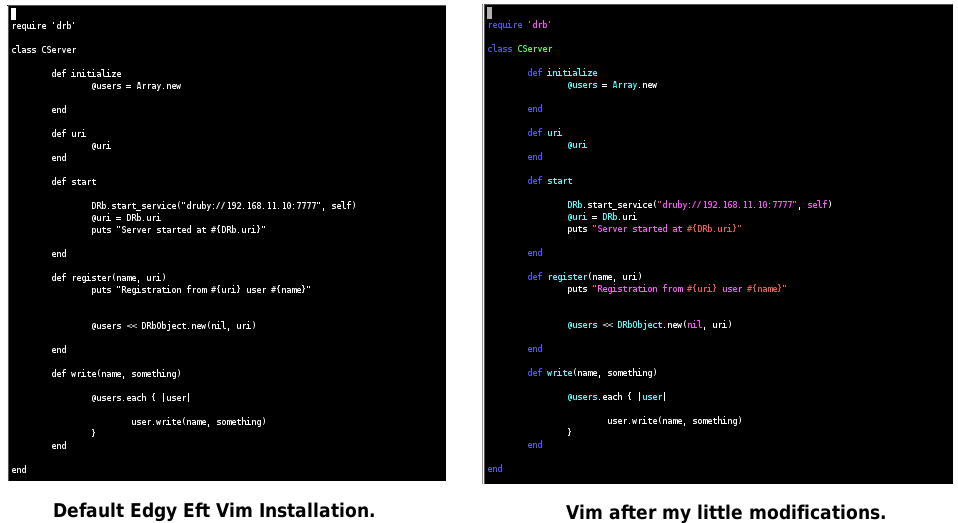
For comparison see the default install and my older configuration screenshot at the end of the post and compare it with my current configuration screenshot at the top of this post.


"""""""""""""""""""""""""""""""""""""""""""""""""""""""""""""""""""""""""""""""

"" General Vim Settings

"""""""""""""""""""""""""""""""""""""""""""""""""""""""""""""""""""""""""""""""

"   In Kubuntu/Ubuntu make sure you have a complete vim install

"   i.e.  sudo aptitude install vim-ruby vim-scripts vim-common

"


" Disable compatibility with vi

set nocompatible


" Use the Unix file format

set fileformats=unix,dos


" Display line number in front of each line in the left margin.

set number


" I keep my own backups and all those files ending in '~' are

" anoying.

set nobackup


" Display commands in the bottom right corner as they are typed.

set showcmd


" Smoother redraws

set ttyfast


" Avoid vim complains about not written file when jumping

" between buffers using ctags.

set autowrite


" Vim Tip #1160 - Auto Save files when focus is lost.

au FocusLost * :wa


" Vim Tip #1279 - Highlight current line in Insert Mode

autocmd InsertLeave * se nocul

autocmd InsertEnter * se cul


" Enable syntax highlighting with 256 color support so we

" can use nicer color schemes. For more information and to

" get some nice color schemes check:

"   http://www.frexx.de/xterm-256-notes/

" Tested with Konsole-2.1 and yakuake 2.9.4

set t_Co=256

syntax on


" Set this background depending on your console and color scheme.

set background=light

"set background=dark


" My favorite color schemes. You must download the color themes

" and put them inside the color folder of your vim installation.

"colors default     " Good fro transparent consoles

"colors zenburn     " Vim Tip #415

colors 256_asu1dark " http://www.frexx.de/xterm-256-notes/

"colors pyte        " Vim Tip #1492


" If in diff mode (vimdiff) use the inkpot color scheme

" that better highlights file differences

if &diff

  colors inkpot    " Vim Tip #1143

endif


" Additional filetypes

au BufRead,BufNewFile sconstruct setlocal filetype=python

au BufRead,BufNewFile *.rl       setlocal filetype=ragel

au BufRead,BufNewFile *.rb       setlocal filetype=ruby


" Additional Syntax Files. The ragel.vim file can be downloaded

" from Ragel's home page http://www.complang.org/ragel/.

au! Syntax ragel source ragel.vim


" Set path to search (i.e. gf) files recursively

set path=/usr/include,/usr/local/include,**;$HOME


" Vim Tip #1274 - Highlight trailing whitespace characters

set list

set listchars=tab:->,trail:·


" Number of spaces used for (auto)indenting

"set shiftwidth=2


" Number of spaces to insert for a tab

"set softtabstop=2

set tabstop=2


" Insert spaces when the tab key is pressed

" If you want a real tab use "ctrl-v, tab" in insert mode. This

" is usefull for Makefiles that require real tabs to work.

set expandtab


" Word wrap with line breaks if they are longer than 80 characters

" long. If you prefer to wrap lines visually only use the wrap and

" lbr commands below instead. If you have a document that has lines

" longer than 80 characters you can use "gq}" to format it as a

" paragraph. This is more easier format for navigating the text.

set textwidth=80

set formatoptions=tcq


" Vim Tip #989: Word wrap without line breaks

"set wrap

"set lbr


" Enable specific indenting

set autoindent

set smartindent


" Enable code folding

set foldmethod=syntax


" Show briefly matching bracket when closing it.

set showmatch


" Show cursor position

set ruler


" Additonal key mappings

map <F12> <ESC>ggVGg?                             " ROT13 fun


"""""""""""""""""""""""""""""""""""""""""""""""""""""""""""""""""""""""""""""""

"" Mini buffer explorer features

"""""""""""""""""""""""""""""""""""""""""""""""""""""""""""""""""""""""""""""""

let g:miniBufExplSplitBelow=0

let g:miniBufExplSplitToEdge = 0

let g:miniBufExplVSplit = 20

let g:miniBufExplMapCTabSwitchBufs = 1

let g:miniBufExplUseSingleClick = 1

let g:miniBufExplorerMoreThanOne=0 

let g:miniBufExplModSelTarget = 1


" Map Tab and Shift-Tab for buffer navigation

" Note that S-TAB does not work in certain consoles (i.e. KDE Konsole)

map <TAB> <ESC><C-TAB>

map <S-TAB> <ESC><C-S-TAB>


"""""""""""""""""""""""""""""""""""""""""""""""""""""""""""""""""""""""""""""""

"" Improve VIM autocomplete features

"""""""""""""""""""""""""""""""""""""""""""""""""""""""""""""""""""""""""""""""

" Enable search as you type:

set incsearch


"improve autocomplete menu color

highlight Pmenu ctermbg=238 gui=bold


" http://www.cuberick.com/2008/10/ruby-autocomplete-in-vim.html

autocmd FileType ruby,eruby set omnifunc=rubycomplete#Complete

autocmd FileType ruby,eruby let g:rubycomplete_buffer_loading = 1

autocmd FileType ruby,eruby let g:rubycomplete_rails = 1

autocmd FileType ruby,eruby let g:rubycomplete_classes_in_global = 1


""""""""""""""""""""""""""""""""""""""""""""""""""""""""""""""""""""""""""""""""

" Vim tip #90 Enable VCS integration in vim

""""""""""""""""""""""""""""""""""""""""""""""""""""""""""""""""""""""""""""""""

"  Get vcscommand.zip from http://www.vim.org/scripts/script.php?script_id=90

"  Uncompress to your vim directory:  unzip -d ~/.vim vcscommand.zip

"

"  Now when editing a file that is under revision control (SVN, CVS, Git,...)

"  we can access the versioning commands:

"

"  VCSAdd

"  VCSAnnotate

"  VCSCommit

"  VCSDelete

"  VCSDiff

"  VCSGotoOriginal

"  VCSGotoOriginal!

"  VCSInfo

"  VCSLog

"  VCSLock

"  VCSReview

"  VCSStatus

"  VCSUpdate

"  VCSUnlock

"  VCSVimDiff


" Map F4 to VimDiff to check differences

map <F4> <ESC>:VCSVimDiff<CR>


""""""""""""""""""""""""""""""""""""""""""""""""""""""""""""""""""""""""""""""""

" Latex Configuration

" http://vim-latex.sourceforge.net/documentation/latex-suite/recommended-settings.html

""""""""""""""""""""""""""""""""""""""""""""""""""""""""""""""""""""""""""""""""

au BufRead,BufNewFile *.cls      setlocal filetype=tex

"let g:tex_flavor='latex'   " loads latexsuite with empty tex files.

set iskeyword+=:           " type /ref{fig: and press <C-n> to autocomplete references


""""""""""""""""""""""""""""""""""""""""""""""""""""""""""""""""""""""""""""""""

" Working with Makefiles

"

" Press F5 to compile and open the error window if there

" are errors. If there are errors you can use :cn and :cN to

" jump foward and backward thru the error list. Press :ccl to

" close the error list or F5 again to recompile

map <F5> <ESC>:make<CR><ESC>:botright cwindow<CR> " Compile and open quick fix list

map <F6> <ESC>:cN<CR>                             " Jump to prev error/warn

map <F7> <ESC>:cn<CR>                             " Jump to next error/warn


""""""""""""""""""""""""""""""""""""""""""""""""""""""""""""""""""""""""""""""""

" Enable spell checking in latex, bib and txt files

" Commands:

"            [s      ->  jump to next bad word

"            ]s      ->  jump to prev bad word

"            z=      ->  suggest word

"            zg      ->  mark word as good (add to dictionary)

"            zw      ->  mark word as bad  (remove from dictionary)

"            :h spell -> get more details about spelling

""""""""""""""""""""""""""""""""""""""""""""""""""""""""""""""""""""""""""""""""

au BufRead,BufNewFile *.txt,*.tex,*.bib  setlocal spell spelllang=en_us


"""""""""""""""""""""""""""""""""""""""""""""""""""""""""""""""""""""""""""""""

" Other Good Vim tips not used here

"""""""""""""""""""""""""""""""""""""""""""""""""""""""""""""""""""""""""""""""

" Vim Tip #64   - Set working dir to the file you are editing

"                 Why not used: Makes difficult the management of sessions and

"                   makefiles.

" Vim Tip #305  - List of editing vim tips

"                 Why not used: I can remember all the commands I use.

" Vim Tip #1203 - mapping to set up vtreeexplorer and taglist in left window

"                 Why not used: I use MiniBufExpl instead of vtreeexplorer

" Vim Tip #1318 - An attempt to emulate TextMate's snippet expansion

"                 Why not used: I am unable to get this working correctly.

" Vim Tip #???? - Force gf to open in new tabs  

"                 Command: nnoremap gf <C-W>gf

"                 Why not used: I use MiniBufExpl so no more tabs for me.

" Vim Tip #565  - Never see ^M and pesky trailing spaces again

"                 Command: autocmd BufRead * silent! %s/[\r \t]\+$//

"                 Why not used: Not a good idea when working with others source

"                  code. All the automatically deleted chars will be seen as

"                  changes in the diff files making it difficult to review the

"                  changes. Never use this if you plan to submit patches to ffmpeg

"                  or the Linux kernel or they will spam filter you forever!