Thursday, October 09, 2008

Make Vim and Ctag play nice together


The classic tutorial of Ctags + Vim will go something like:

  • - Install exuberant ctags

  • - Generate tags for your project

  • - Also install the tag list plugin

  • - Use ^] and ^T to jump around the code


In this post I will try to go a little further and show how I manage tags in vim for real and large C projects.

Note that I mostly program in C (not C++), Ruby and Bash so I cannot guarantee my method works for all languages. In special Ctags has problems supporting C++. On the other side I have worked in small projects in Java and Python and I had no problems navigating them with my method.

Pre requisites


The following instructions were tested on a Linux machine installed using Kubuntu 8.10, 9.04 and 9.10. The first step is of course to make sure you have installed Vim and exuberant-ctags in you machine:


sudo aptitude install vim-ruby vim-scripts vim-common exuberant-ctags


If you are new to Vim then you should take some time to set your minimal configuration. You may follow mine if you want link.

Generate system wide ctags


All large projects will use at some point external libraries. My C projects usually use the Linux/FreeBSD system calls, SDL, OpenGL, libavcodec and libavformat among others.

To be able to jump to these libraries we must generate tags for each of them. I usually generate them inside my vim directory but you may create them in a system wide folder.

This is extremely useful to easily find out the members of libavcodec large structs or to quickly find out what are the arguments of SDL functions or system calls.

Ctags for Linux System Calls


mkdir -p ~/.vim/tags
sudo aptitude install linux-headers-`uname -r`
ctags -R -f ~/.vim/tags/kerneltags /usr/src/linux-headers-`uname -r`


Ctags for Ruby core and gem libraries


mkdir -p ~/.vim/tags
ctags -R -f ~/.vim/tags/rbtags /usr/lib/ruby


Ctags Java libraries


# For the java tags to work you need to install java source package.
# In Kubuntu/Ubuntu follow these instructions:
mkdir -p ~/.vim/tags
sudo aptitude install sun-java6-source
sudo mkdir -p /usr/lib/jvm/java-6-sun/src
sudo unzip -d /usr/lib/jvm/java-6-sun/ /usr/lib/jvm/java-6-sun/src.zip
ctags -R -f ~/.vim/tags/javatags /usr/lib/jvm/java-6-sun/src


At this you should be able to create tags for all the libraries you use in your projects. Simply get the source code or development packages of the library and run ctags on the folder that contains the source code and save the tags in a file you can access.

TODO: I really need to research what are the best ctags flags for each language in order to generate the most information possible per tag.

Updating your system wide ctags


Here we have three options:

  • Update your system/library tags manually each time you upgrade them

  • Use a cron job to update them every certain period of time (e.g. once a week).

  • Use incrontab to monitor changes in the system/library folders and automatically update the tags every time these folders change.


Personally I use the cron job method and for some libraries that I update often (e.g. libavcodec from subversion) I manually generate the tags soon after I update the library.

I found about incrontab just recently and I think will be the best way to update system wide tags. It behaves mostly like crontab but instead of triggering actions based on time periods it triggers by file system events like file change, move, save, etc. It should be easy to monitor the folders containing the libraries of interest and regenerate the tags for each library based on change events in the folder contents. The tricky part would be to determine what file system event we must listen to decide if we should regenerate or not the tags.

Generating ctags for your own libraries/projects


Now we need to generate tags for projects/libraries we are developing at the moment. These projects are constantly changing so we need to update them as soon as possible.

This is a common problem that lot's of people solve in different ways. See for example these links:


Most methods I found do the same more or less: they set some auto commands to autogenerate tag files when a file is edited and set the search path in a way it can find the generated tags.

I used to have some autocommands in vim to generate tags every time I modified a file in a project. Unfortunately I never figured out how to generate a single tags file per project/library. I always ended with a global tag file for all projects or a single tag file per folder.

Another methods worked by adding tags generation commands to the build system so the tags get generated when we recompile the project (e.g. Makefile, Ant, CMake) and others simply created scripts per project and executed them manually from the project root directory or within vim using a key map.

Since I use the Project.vim plugin it is natural for me to use it to generate the tags files as it is done here. My method is a lot different in that I do not use a Makefile to generate the tags and I only re-generate them when a file has been edited, not every time we open a file.

Auto-generating Ctags Using the Project.vim plugin


Anyone that has used the Project.vim plugin is familiar with the snippet shown below:


myproj=<src-path> in=in.vim out=out.vim CD=<src-path> {
CMakeLists.txt
in.vim
out.vim
include-----------------
src---------------------
test--------------------
tools-------------------
}


This corresponds to a project entry called "myproj" with root directory set to "src-path". Here the important parts are the "in", "out" and "CD" parameters.

The "CD" parameter makes sure that you are at the project root directory when editing a file from that project. This is useful to have a single tags file per project.

The "in" and "out" parameters are simple vim scripts. The "in" script is executed when opening a file from the project and the "out" script when leaving the file. In these scripts is where I set/unset the autocommands that take care of generating the tags files per project.

Every time I create a new project using the Project.vim plugin I also create these in.vim and out.vim scripts:

in.vim


" let ctags_cmd='/usr/local/bin/exctags'   " Use this one in FreeBSD

let ctags_cmd='/usr/bin/ctags'             " Use this one in Linux

let proj_path = escape(getcwd(), ' ')

let _ctagargs_ = " --fields=+iaS --extra=+q -R "

let _ctag_ = ctags_cmd . _ctagargs_ . " -f " . proj_path . "/.tags " . proj_path

au BufWritePost <buffer> call system(_ctag_)


out.vim


au! * <buffer>


Now every time you open a file from a project an autocommand will be created for that file that will regenerate tags for the whole project every time the file is saved. The generated tags file is always in the root directory of the project. You may prefer to use the "--append" switch of ctags to generate tags for the current file only but I personally prefer regenerating the tags of the whole project every time.

When you leave the file the autocommand is removed in the out.vim script. If we do not remove the autocommand, it will be created every time we enter the file that results in a lot of autocommands around. I am not really sure if this can cause problems but is better go on the safe side.

Now the last piece of the puzzle is how to tell Vim where to search for the tags.

Tell Vim where to search for tags


To find the per project tags we can simply add this to our vimrc file:


set tags=./.tags;${HOME}


This simple command tells vim to search tag files from the current directory backwards up to our $HOME directory. Since we are sure that we are always at the projects root directory where the tags file is automatically generated we can be sure that vim will always find the tag we are looking for.

There are some system wide tags that we want to always load depending on the language we are developing. For example when I develop in C I would like to have the kernel system calls tag file (that we generated before) or when developing in Ruby/Java I expect to have these languages core tags loaded too.

To do this I load all system wide libraries based on filetype using these commands in my vimrc file:


au BufRead,BufNewFile *.rb setlocal tags+=~/.vim/tags/rbtags

au BufRead,BufNewFile *.cpp,*.h,*.c setlocal tags+=~/.vim/tags/kerneltags

au BufRead,BufNewFile *.rl,*.def setlocal tags+=~/.vim/tags/kerneltags

au BufRead,BufNewFile *.py setlocal tags+=~/.vim/tags/pytags

au BufRead,BufNewFile *.java setlocal tags+=~/.vim/tags/javatags


What these commands do is to load the system wide tag files we generated before depending on the file type. For example when editing a ruby file it loads the Ruby tags file.

We must note that the commands only apply to the current file being edited (e.g. setlocal), not all the files in the project and that we are adding the tags file not replacing the current one (e.g. += ).

Finally how can we add other tag files to the project that are not from the project itself and not system wide?. For example my project requires external libraries like libavcodec and SDL so it would be nice to query the function and struct definitions of these libraries.

To do this I use the "in.vim" script of the Project.vim plugin like:


" let ctags_cmd='/usr/local/bin/exctags'   " Use this one in FreeBSD

let ctags_cmd='/usr/bin/ctags'             " Use this one in Linux

let proj_path = escape(getcwd(), ' ')

let _ctagargs_ = " --c++-kinds=+p --fields=+iaS --extra=+q -R "

let _ctag_ = ctags_cmd . _ctagargs_ . " -f " . proj_path . "/.tags " . proj_path

au BufWritePost <buffer> call system(_ctag_)


" Add external library tag files

setlocal tags+=~/.vim/tags/sdltags

setlocal tags+=~/.vim/tags/ffmpegtags


This is exactly the same "in.vim" script as above with two added lines that include the libavcodec (FFMpeg) and SDL library tags files to the search path of vim for all files in the project. These files were of course generated before the same way we created the system wide tag files and updated via a cron job.

Once you setup this once you don't need to worry about this anymore until you reinstall your computer. The system wide libraries will be always updated if you configured the corresponding cron jobs and once a project is created it will always have the tags files updated and ready to query.

Setting up the TagList Plugin


No blog post about Vim+Ctags is complete without the mighty TagList plugin. To install this plugin go to http://vim-taglist.sourceforge.net/ and download the taglist_45.zip file. Then add it to your vim installation using the command:

unzip -d ~/.vim taglist_45.zip

Then add these commands to your vimrc file:


" let Tlist_Ctags_Cmd='/usr/local/bin/exctags'   " Use this one in FreeBSD

let Tlist_Ctags_Cmd='/usr/bin/ctags'             " Use this one in Linux

let Tlist_Auto_Open=0

let Tlist_Auto_Update=1

let Tlist_Use_Horiz_Window = 0

"let Tlist_Inc_Winwidth=0

"let Tlist_Show_One_File=1

let Tlist_Exist_OnlyWindow=1

let Tlist_Use_Right_Window = 1

let Tlist_Sort_Type="name"

let Tlist_Display_Prototype=0

let Tlist_Compact_Format=1 " Compact?

let Tlist_GainFocus_On_ToggleOpen=1

let Tlist_Display_Tag_Scope=1

let Tlist_Close_On_Select=1

let Tlist_Enable_Fold_Column=1

"let TList_WinWidth=25


" Map a F8 to the TlistToggle command for easy tags list access

nnoremap <silent> <F8> <ESC>:TlistToggle<CR>


Of course I recommend you to read the help file and set the configuration as it fits you better. With my configuration you can press to open the tags list window and when you press on a tag the windows automatically closes. This is specially useful on small screen laptops to allow more code visible all the time.

Wednesday, October 08, 2008

Basic .vimrc file


My first Vim configuration files: .vimrc, plugins, color schemes, etc were very small and modest. It's been eight years since I started using Vim and these configuration files have morphed, evolved, grown and recently shrink in too many ways, more than I can remember, and every time I check www.vim.org I find new ways I would like my Vim to evolve even further.

Here is the simplest version of my .vimrc file with no ctags or desktop integration as these topics require a separate post to explain. Most of the options here can be understood directly from Vim help files and by the comments in the file itself.

If you would like to use this file make sure to copy it in your home directory and read the comments as to get full functionality.

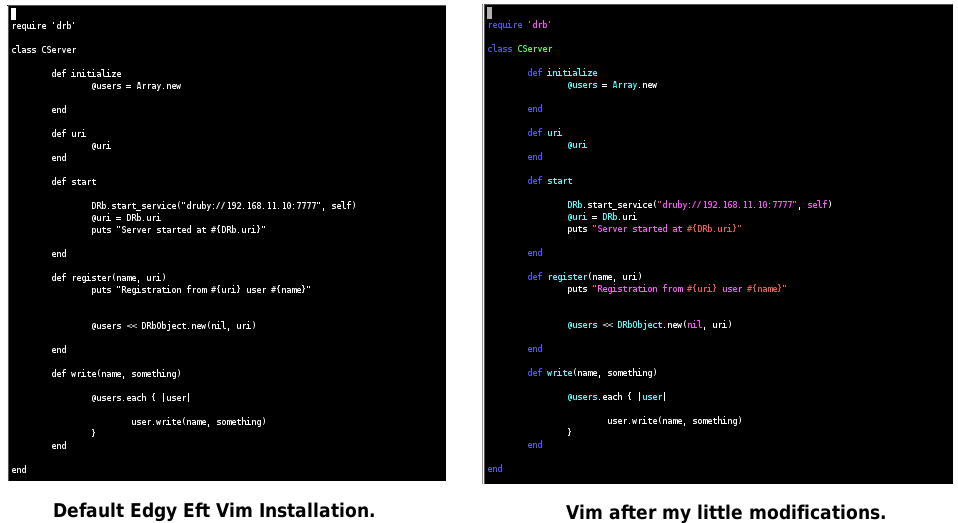
For comparison see the default install and my older configuration screenshot at the end of the post and compare it with my current configuration screenshot at the top of this post.


"""""""""""""""""""""""""""""""""""""""""""""""""""""""""""""""""""""""""""""""

"" General Vim Settings

"""""""""""""""""""""""""""""""""""""""""""""""""""""""""""""""""""""""""""""""

"   In Kubuntu/Ubuntu make sure you have a complete vim install

"   i.e.  sudo aptitude install vim-ruby vim-scripts vim-common

"


" Disable compatibility with vi

set nocompatible


" Use the Unix file format

set fileformats=unix,dos


" Display line number in front of each line in the left margin.

set number


" I keep my own backups and all those files ending in '~' are

" anoying.

set nobackup


" Display commands in the bottom right corner as they are typed.

set showcmd


" Smoother redraws

set ttyfast


" Avoid vim complains about not written file when jumping

" between buffers using ctags.

set autowrite


" Vim Tip #1160 - Auto Save files when focus is lost.

au FocusLost * :wa


" Vim Tip #1279 - Highlight current line in Insert Mode

autocmd InsertLeave * se nocul

autocmd InsertEnter * se cul


" Enable syntax highlighting with 256 color support so we

" can use nicer color schemes. For more information and to

" get some nice color schemes check:

"   http://www.frexx.de/xterm-256-notes/

" Tested with Konsole-2.1 and yakuake 2.9.4

set t_Co=256

syntax on


" Set this background depending on your console and color scheme.

set background=light

"set background=dark


" My favorite color schemes. You must download the color themes

" and put them inside the color folder of your vim installation.

"colors default     " Good fro transparent consoles

"colors zenburn     " Vim Tip #415

colors 256_asu1dark " http://www.frexx.de/xterm-256-notes/

"colors pyte        " Vim Tip #1492


" If in diff mode (vimdiff) use the inkpot color scheme

" that better highlights file differences

if &diff

  colors inkpot    " Vim Tip #1143

endif


" Additional filetypes

au BufRead,BufNewFile sconstruct setlocal filetype=python

au BufRead,BufNewFile *.rl       setlocal filetype=ragel

au BufRead,BufNewFile *.rb       setlocal filetype=ruby


" Additional Syntax Files. The ragel.vim file can be downloaded

" from Ragel's home page http://www.complang.org/ragel/.

au! Syntax ragel source ragel.vim


" Set path to search (i.e. gf) files recursively

set path=/usr/include,/usr/local/include,**;$HOME


" Vim Tip #1274 - Highlight trailing whitespace characters

set list

set listchars=tab:->,trail:·


" Number of spaces used for (auto)indenting

"set shiftwidth=2


" Number of spaces to insert for a tab

"set softtabstop=2

set tabstop=2


" Insert spaces when the tab key is pressed

" If you want a real tab use "ctrl-v, tab" in insert mode. This

" is usefull for Makefiles that require real tabs to work.

set expandtab


" Word wrap with line breaks if they are longer than 80 characters

" long. If you prefer to wrap lines visually only use the wrap and

" lbr commands below instead. If you have a document that has lines

" longer than 80 characters you can use "gq}" to format it as a

" paragraph. This is more easier format for navigating the text.

set textwidth=80

set formatoptions=tcq


" Vim Tip #989: Word wrap without line breaks

"set wrap

"set lbr


" Enable specific indenting

set autoindent

set smartindent


" Enable code folding

set foldmethod=syntax


" Show briefly matching bracket when closing it.

set showmatch


" Show cursor position

set ruler


" Additonal key mappings

map <F12> <ESC>ggVGg?                             " ROT13 fun


"""""""""""""""""""""""""""""""""""""""""""""""""""""""""""""""""""""""""""""""

"" Mini buffer explorer features

"""""""""""""""""""""""""""""""""""""""""""""""""""""""""""""""""""""""""""""""

let g:miniBufExplSplitBelow=0

let g:miniBufExplSplitToEdge = 0

let g:miniBufExplVSplit = 20

let g:miniBufExplMapCTabSwitchBufs = 1

let g:miniBufExplUseSingleClick = 1

let g:miniBufExplorerMoreThanOne=0 

let g:miniBufExplModSelTarget = 1


" Map Tab and Shift-Tab for buffer navigation

" Note that S-TAB does not work in certain consoles (i.e. KDE Konsole)

map <TAB> <ESC><C-TAB>

map <S-TAB> <ESC><C-S-TAB>


"""""""""""""""""""""""""""""""""""""""""""""""""""""""""""""""""""""""""""""""

"" Improve VIM autocomplete features

"""""""""""""""""""""""""""""""""""""""""""""""""""""""""""""""""""""""""""""""

" Enable search as you type:

set incsearch


"improve autocomplete menu color

highlight Pmenu ctermbg=238 gui=bold


" http://www.cuberick.com/2008/10/ruby-autocomplete-in-vim.html

autocmd FileType ruby,eruby set omnifunc=rubycomplete#Complete

autocmd FileType ruby,eruby let g:rubycomplete_buffer_loading = 1

autocmd FileType ruby,eruby let g:rubycomplete_rails = 1

autocmd FileType ruby,eruby let g:rubycomplete_classes_in_global = 1


""""""""""""""""""""""""""""""""""""""""""""""""""""""""""""""""""""""""""""""""

" Vim tip #90 Enable VCS integration in vim

""""""""""""""""""""""""""""""""""""""""""""""""""""""""""""""""""""""""""""""""

"  Get vcscommand.zip from http://www.vim.org/scripts/script.php?script_id=90

"  Uncompress to your vim directory:  unzip -d ~/.vim vcscommand.zip

"

"  Now when editing a file that is under revision control (SVN, CVS, Git,...)

"  we can access the versioning commands:

"

"  VCSAdd

"  VCSAnnotate

"  VCSCommit

"  VCSDelete

"  VCSDiff

"  VCSGotoOriginal

"  VCSGotoOriginal!

"  VCSInfo

"  VCSLog

"  VCSLock

"  VCSReview

"  VCSStatus

"  VCSUpdate

"  VCSUnlock

"  VCSVimDiff


" Map F4 to VimDiff to check differences

map <F4> <ESC>:VCSVimDiff<CR>


""""""""""""""""""""""""""""""""""""""""""""""""""""""""""""""""""""""""""""""""

" Latex Configuration

" http://vim-latex.sourceforge.net/documentation/latex-suite/recommended-settings.html

""""""""""""""""""""""""""""""""""""""""""""""""""""""""""""""""""""""""""""""""

au BufRead,BufNewFile *.cls      setlocal filetype=tex

"let g:tex_flavor='latex'   " loads latexsuite with empty tex files.

set iskeyword+=:           " type /ref{fig: and press <C-n> to autocomplete references


""""""""""""""""""""""""""""""""""""""""""""""""""""""""""""""""""""""""""""""""

" Working with Makefiles

"

" Press F5 to compile and open the error window if there

" are errors. If there are errors you can use :cn and :cN to

" jump foward and backward thru the error list. Press :ccl to

" close the error list or F5 again to recompile

map <F5> <ESC>:make<CR><ESC>:botright cwindow<CR> " Compile and open quick fix list

map <F6> <ESC>:cN<CR>                             " Jump to prev error/warn

map <F7> <ESC>:cn<CR>                             " Jump to next error/warn


""""""""""""""""""""""""""""""""""""""""""""""""""""""""""""""""""""""""""""""""

" Enable spell checking in latex, bib and txt files

" Commands:

"            [s      ->  jump to next bad word

"            ]s      ->  jump to prev bad word

"            z=      ->  suggest word

"            zg      ->  mark word as good (add to dictionary)

"            zw      ->  mark word as bad  (remove from dictionary)

"            :h spell -> get more details about spelling

""""""""""""""""""""""""""""""""""""""""""""""""""""""""""""""""""""""""""""""""

au BufRead,BufNewFile *.txt,*.tex,*.bib  setlocal spell spelllang=en_us


"""""""""""""""""""""""""""""""""""""""""""""""""""""""""""""""""""""""""""""""

" Other Good Vim tips not used here

"""""""""""""""""""""""""""""""""""""""""""""""""""""""""""""""""""""""""""""""

" Vim Tip #64   - Set working dir to the file you are editing

"                 Why not used: Makes difficult the management of sessions and

"                   makefiles.

" Vim Tip #305  - List of editing vim tips

"                 Why not used: I can remember all the commands I use.

" Vim Tip #1203 - mapping to set up vtreeexplorer and taglist in left window

"                 Why not used: I use MiniBufExpl instead of vtreeexplorer

" Vim Tip #1318 - An attempt to emulate TextMate's snippet expansion

"                 Why not used: I am unable to get this working correctly.

" Vim Tip #???? - Force gf to open in new tabs  

"                 Command: nnoremap gf <C-W>gf

"                 Why not used: I use MiniBufExpl so no more tabs for me.

" Vim Tip #565  - Never see ^M and pesky trailing spaces again

"                 Command: autocmd BufRead * silent! %s/[\r \t]\+$//

"                 Why not used: Not a good idea when working with others source

"                  code. All the automatically deleted chars will be seen as

"                  changes in the diff files making it difficult to review the

"                  changes. Never use this if you plan to submit patches to ffmpeg

"                  or the Linux kernel or they will spam filter you forever!


Thursday, September 25, 2008

Canon Satera LBP5910 Linux Driver 2.20

If you have a Canon printer based on the LIPSLX driver (i.e. LBP family) and you use Ubuntu 10.10 or 11.04 then you are lucky because Canon provides the linux drivers for these printers. Simply go to this page Canon Linux Driver check for the supported printers and the respective drivers. For my case I have the LBP5910F printer that is supported by the LIPS LX Printer Driver so I enter this page and download the two corresponding .deb packages for Ubuntu/Debian. If you use Redhat or any other distribution that uses RPMs then download the corresponding RPMs.

Install Canon LBP5910F Driver on Ubuntu 10.10 and 11.04 32bit

Now enter CUPS configuration page (i.e. http://localhost:631) and follow the steps. In my case the printer was already listed in the select box of printers with IP address and everithing. In Make/Manufacturer select Canon and finally in Model/Driver select the corresponding driver: And that is all now you can try to print a test page.

Install Canon LBP5910F Driver on Ubuntu 10.10 and 11.04 64bit

For some reason there are no deb packages for 64bit architecture but fortunately is easy to convert the 64bit rpms to deb packages using alien. First install the alien package: then using this tool convert the rpm packages to deb packages: this will generate two 64bit deb packages that work perfectly with Ubuntu/Kubuntu and can be installed as the 32 bit versions above: after installing the packages you can proceed with the installation the same way as with the 32bit packages.

Wednesday, June 25, 2008

Use PuTTY generated keys with SftpDrive

So you created a public/private key pair using PuTTYgen and now you want to use these keys in other applications like OpenSSH and/or SftpDrive but you realise that the private key generated by PuTTYgen is not compatible with these programs??

No worries... all you have to do is convert your PuTTYgen key (.ppk) to and OpenSSH compatible key and it happens to be that PuTTYgen can do this conversion.


Open PuTTYgen and load your private key using the "load" button and opening your private key .ppk file. Once loaded select from the top menu "Conversions -> Export OpenSSH key" and select a file name to save the exported key. Now this saved key can be used in other applications that are OpenSSH compatible.


To use this key with SftpDrive open SftpDrive Manager and on "New Driver" change the Authentication method (see image above) to "Use a public key to log in...". This will open a dialog box (see image below).


Here you can generate a new public/private key pair but we want to use the one we generated with PuTTYgen so select "Import Existing Key Pair" that will open yet another dialog box (see image below):


Here simply browse the location of the private and the corresponding public keys and press "OK". Now SftpDrive will use these keys to connect to your SSH server.

If you get errors make sure you have selected the exported OpenSSH compatible key and not the PuTTYgen generated one (i.e. .ppk). Also if you saved the public key using the PuTTYgen "save public key" button then this key has a format SftpDrive does not understands so it will be unable to read the key. To solve this copy and paste the public key as it appears in PuTTYgen text box (i.e. the large string starting with ssh-rsa or ssh-dsa) in a text file (i.e. mykey.pub) and then import that file as the public key. This format is OpenSSH compatible so should work with no problems.

Tuesday, June 24, 2008

Subversion + OpenSSH Server + PuTTY Client Setup

This setup is of a subversion server running on Linux (Kubuntu 8.04) and subversion clients (Tortoise SVN) running in Windows (WinXP).

Pre-requisites

I assume you already have a subversion repository working and now you want to access it using ssh tunnelling for security reasons. Also the server must have remote ssh access and be configured to do Private Key authentication.

Setting up Putty

The best SSH client and related tools for Windows are the PuTTY family of programs that can be found at http://www.chiark.greenend.org.uk/~sgtatham/putty/. You can download the individual ".exe" files an put them in your path but I recommend you to use the installer that will install all the tools and set them nicely in your start menu.

Create public/private key pair


Objective

To access the subversion server via ssh you need a public/private key pair. To generate these key pair you can use the PuTTY Key Generator (PuTTYgen.exe) that was installed along with PuTTY installer.

Simply execute the PuTTYgen.exe program and press the "generate" button. After that keep moving your mouse, to generate some randomness, until the progress bar reaches the end. At this point you will get your public and private keys generated.

Make sure you add a "Key passphrase" that will be like a password to access the keys. The comment part is not necessary but is customary to put your email address.

Also make sure you are generating a SSH-2 key pair as SSH-1 is not secure. Choosing between RSA or DSA keys is a matter of application. It is known that DSA is fast at key generation and signing while RSA is faster at verification. So if your application requires a lot of signing (i.e. SSL Web Application) then DSA is good but if your application requires a lot of verifying (i.e. Subversion) then RSA is best. Since we are going to use this key for Subversion I recommend subversion but you are free to use the one you prefer.

Now we need to save your generated keys somewhere in your hard disk. The public key is visible in the PuTTYgen application widget (i.e. the long sequence of letters in the top text box). This key starts usually with "ssh-rsa" or "ssh-dsa" depending on what type of key you generated (RSA or DSA).

To save your public key on disk do not use the "save public key" button as this will generate a key in a format that is not compatible with OpenSSH. Simply copy and paste the key from the text box to a file on disk. You can save this file with whatever name you like but I recommend putting a ".pub" extension just as OpenSSH does.

The private key you must save it using the "save private key" button as this generates a file with ".ppk" extension that is understood only by PuTTY programs. Make sure you put the same name as the public key but with the ".ppk" extension instead of ".pub".

As an additional step if you would like to use your private key with other applications like SftpDrive so these can also connect to the OpenSSH server without need for a password, then you must convert your private key (.ppk file) to the OpenSSH key format. To do this simply select "Conversions" in the PuTTYgen.exe menu and then "Export OpenSSH key" to generate a key that can be used with OpenSSH compatible applications.

Note that with PuTTYgen.exe you can convert your private keys between PuTTY (.ppk) format and OpenSSH format so if you generate your public/private keys using OpenSSH ssh-keygen program you can use them in PuTTY by importing the private key using PuTTYgen.

Setting your public keys

The way the public/private key pair are used is simple. You keep the private key in your local machine usually in a key manager like ssh-agent or pageant and send your public key to all the servers you want to access via ssh.

To set up your public key in the SSH server (assumed OpenSSH server) simply log to the server shell using your account username and password (if you don't have one ask you administrator or if you are the administrator create one yourself). Then copy the contents of your public key file inside the file "~/.ssh/authorized_keys2".

To do this edit the "~/.ssh/authorized_keys2" file with any text editor (Vi, Nano, Kwrite, gEdit) and make sure it looks like in the next figure:


The key must start with ssh-rsa or ssh-dsa depending on the key you generated followed by the key all in one line (i.e. no new lines and spaces) and finally the comment again all in one line.

Finally make sure the authorized_keys2 file has correct permissions by executing "chmod 600 authorized_keys2".

You can set the public key in as many SSH servers as you like so you can access them all using the same private key.

Setting your private key

Your private key must be your most guarded secret and shall not be passed to anyone. Only you should have access to this key because anyone who gets his/her hands on that private key can access all the servers where you installed your public key and we don't want anyone to have that access power do we?

To use a your private key we usually use a SSH authentication agent like ssh-agent in Linux/Unix or pageant in Windows. The PuTTY installer comes with pageant.exe that is the one I use and recommend.

Simply execute pageant.exe from the application menu and a small icon will appear in your system tray. Right click the icon and select "Add key" on the context menu, then browse the directory where you saved your private key (i.e. .ppk) and select it. And that is it....

Testing SSH access

To test open the PuTTY.exe SSH client and create a new session to connect to your SSH server (make sure you save the session). When you open the session it should log you in without asking for any username and passwords. If it asks you for username and password then you did something wrong. Make sure the publickey format is correct on the server and that the private key is set in pageant. Of course make sure the OpenSSH server is running on the remote machine and that pageant is running on the local machine.

Once you can connect to the SSH server without need for a username and password then we can proceed to set up TortoiseSVN to access your Subversion repositories via SSH tunnels.

Setting TortoiseSVN with SSH tunnelling

Once you have SSH set to work with public/private key authentication and have pageant configured configuring TortoiseSVN is a breeze. All you have to do is make sure you use the correct URL format to access the repository.

If you have TortoiseSVN installed try to make a checkout and in the URL put something like:

svn+ssh://username@hostname/dir/to/repo

And you should be able to ckeck out that project over an SSH tunnel. You don't even need to have svnserve running on the server as the svn+ssh scheme tells the TortoiseSVN to start it for you and tunnel it over SSH.

Of course replace username with the username you use to access the SSH server and hostname with the IP address or FQDN of your SSH server. The path to the repository must be absolute path starting from the root "/" directory and have correct access privileges (read/write) for the username you use.


Resources

http://neubia.com/archives/000191.html
http://www.unixwiz.net/techtips/putty-openssh.html

Saturday, June 14, 2008

Best gift ever??

Now I can reaffirm that I married the right person, just look what I got for fathers day!!!


I know I do not blog that often but be assured that now I will be blogging none at all for at least a few weeks, or months....

Thursday, April 17, 2008

Plotting SVN history??

Found a blog post by Samuel Jansen were he plots his subversion repository history so out of curiosity I plotted mine too...

actually nothing interesting, steady development almost linear and as you can see but it made me notice that I am almost near my 1000 mark!! when I reach it then I will have an excuse to celebrate and give a nice "1000 SVN passed mark present".

Sunday, April 13, 2008

Linux Cafe in Akihabara

Have been in Akihabara (Electric Town) several times but never saw this shop before:


If you read the details below the logo you will see this shop is been there since 2001!! and I never saw it... I must go check my eyes. Anyway if you are an Open Source person walking around Akihabara you may well pass a get yourself a nice cup of open source coffee.

Wednesday, April 09, 2008

Simple Mail Server (Kubuntu)

If you need a small personal mail server to send log reports and system alarms from your Kubuntu machines to a local and/or external mail address then you may use Exim4 that is the default mail server (MTA) that comes with (K)Ubuntu.

To install is very easy:


1 sudo aptitude install exim4 exim4-base


and to configure simply run:


1 sudo dpkg-reconfigure exim4-config


and in the first dialog (image below) select "internet site". For all next options I used the defaults that would allow local users and services to send emails locally and to remote addresses (i.e. gmail accounts).


Now to test the new server you can send a simple email to your Gmail account:


1 mail -s test mygmail@gmail.com

2 test mail

3 .

4 Cc:


The "-s" switch is the mail subject. After the command simply type whatever you want in the mail body. To finish the email press followed by a dot "." and then again. After this you will be prompted with "Cc:" so press and then check your Gmail account. You should have received an email with the message and subject you used above.

Now say you want to receive LogWatch reports or any other mail directed to root in your Gmail account. Then you can simply create an alias in the "/etc/aliases" file like:


1 # Added by installer for initial user

2 root:   mygmail@gmail.com


then rebuild the aliases database


1 sudo newaliases


If you require more complex mail configurations you may check my previous posts about Sendmail and Postfix setup in (K)Ubuntu here.

Friday, April 04, 2008

Get latest ffmpeg (svn) in FreeBSD-7.0

If you want to compile the latest ffmpeg from subversion with some external libraries support like x264, faac, Theora and Vorbis in the latest FreeBSD release (7.0) then follow this simple steps:

If you do not have the ports tree installed (i.e. /usr/ports is empty or non existent) then you can use portsnap to download and update it (these commands must be done as root):


1 pkg_add -r portsnap

2 mkdir /usr/ports

3 portsnap fetch

4 portsnap extract

5 portsnap update


Install some ports to enable more funcionality in ffmpeg (these commands also must be done as root):


 1 # faac support

 2 cd /usr/ports/audio/faac

 3 make install clean

 4

 5 # vorbis support

 6 cd /usr/ports/audio/vorbis-tools

 7 make install clean

 8

 9 # x264 support

10 cd /usr/ports/multimedia/x264

11 make install clean

12

13 # theora support

14 cd /usr/ports/multimedia/libtheora

15 make install clean

16

17 # ffplay support

18 cd /usr/ports/deve/sdl12

19 make install clean


Checkout ffmpeg from subversion, configure, compile and install (only the last command needs root priviledges);


 1 # checkout ffmpeg from subversion

 2 svn co svn://svn.mplayerhq.hu/ffmpeg/trunk ffmpeg

 3 cd ffmpeg

 4

 5 # export library and include paths

 6 # so configure can find the external

 7 # libraries (i.e. x264)

 8 export LIBRARY_PATH=/usr/local/lib

 9 export CPATH=/usr/local/include

10

11 # run configure with desired options

12 ./configure --enable-gpl --enable-pthreads \

13  --enable-shared --enable-swscale  \

14  --enable-libx264 --enable-libfaac \

15  --enable-libtheora --enable-libvorbis \

16  --enable-encoder=g726 --enable-encoder=ljpeg \

17  --enable-encoder=mjpeg

18

19 # compile using GNU Make (gmake), not BSD Make

20 gmake

21

22 # install

23 su root -c 'gmake install'


If you want to enable other external codec libraries supported by ffmpeg make sure to install their respective ports (if available) and then run the configure script with the desired libraries enabled. You can see a list of supported codec libraries with ".configure --help".

Note that this instructions were tested with revision 12684 of ffmpeg subverion but ffmpeg is a very active project and this instructions are not guarantee to work with the latest subversion revision.

Thursday, April 03, 2008

Japanese Input in KDE 4.0.3 (Anthy)

So you want to try the newest and greatest KDE 4.0.3 release but you can't because you need to be able to write other languages other than English like in my case Japanese, Chinese and/or Korean??

After googling I found here that there is a scim input method that allows input of these languages in KDE4 and also fixes some problems with proprietary software like Skype, Adobe Reader, etc.

This input method is called scim-bridge and can be easily installed in Kubuntu with the command:

sudo aptitude install scim-bridge-agent scim-bridge-client-qt4 scim-bridge-client-qt scim-bridge-client-gtk

Then to enable scim-bridge as your input method you can use im-switch:

im-switch -s scim-bridge

or if you do not have im-switch then you can do it manually with:

sudo ln -sf /etc/alternatives/xinput-all_ALL /etc/X11/xinit/xinput.d/scim-bridge


Seems that scim-bridge is now the default input method in Ubuntu/Kubuntu but not sure, see resources below to get more detailed explanation on how to setup SCIM in Ubuntu.

https://help.ubuntu.com/community/SCIM
https://help.ubuntu.com/community/SCIM/Kubuntu
https://wiki.ubuntu.com/InputMethods/SCIM/Setup

Monday, March 03, 2008

Developing Android in Netbeans

Anyone who reads this blog would know that I like Netbeans a lot for mobile development (see here, here, here and here) and when I found that Google's mobile platform (Android) does not have a Netbeans plugin I was very disappointed.

Of course Netbeans enthusiasts developed a plugin (Undroid) but it is not supported by Google, I could not get it to launch the emulator directly from the IDE and currently it does not work with the latest Android SDK so still we do not have a full solution for Android development in Netbeans.

Now if you don't mind working in a mixed setting using Android tools from command line and using Netbeans to code, compile and install your Android applications then here is how you can do it.

Prerequisites

I assume you have the latest Netbeans 6.0.1 already installed and the latest Android SDK m5-rc14 also installed in your computer. I have tested this configuration in my Linux (Kubuntu) machine but should also work in Windows and other Linux distributions.


Creating a new project

The first thing is to create a new project using the activityCreator.py script that comes with the Android SDK:

activityCreator.py --out HelloAndroid org.piaotech.android

this script will create the project skeleton and more important the build.xml file that can be used by Netbeans to build/install your Android applications.


Start Netbeans and create a new "Java Project with Existing Ant Script" as shown in the figure above. In the next screen browse the location of the project directory created by the activityCreator.py script (HelloAndroid above) and the rest of the fields will be filled automatically by Netbeans. You can change the project name if you wish but the default is ok.


In the next screen (figure above) select the Ant tasks that each of the Netbeans commands should execute. I simply put compile for Build Project and install for Run Project.


In the last screen make sure to add the src and res of the project to the Source Package Folders as shown above.


finally select Java Sources Classpath in categories and add the doc directory that is inside the Android SDK as shown in the picture above and press finish.

Running you project

Now you should have your new Android project in Netbeans project view and now you can code and build it as you would using any other Netbeans project. Now if you try to run the application you will get an error indicating that there is no device. This is because I still have not found a way to launch the emulator from within Netbeans so we must launch it manually. From the command line run the emulator:


android-sdk_m5-rc14_linux-x86/tools/emulator


now with the emulator running if you run your project from within Netbeans the Android application will be automatically installed in the emulator.


It takes some effort to setup an Android project in Netbeans and actually there is no benefit from doing this as any java editor with support for Ant scripts can do the same. In my case is simply a matter of preference as all my Java projects are in Netbeans I did not want to have a separate project format only for Android applications.

Note that there is no need to close the emulator each time you rebuild your application so leave it running during the time you are developing. I also recommend you set up a console running the adb logcat command so you can see all the debugging messages (Log.v()) that Android throws.