Thursday, April 17, 2008

Plotting SVN history??

Found a blog post by Samuel Jansen were he plots his subversion repository history so out of curiosity I plotted mine too...

actually nothing interesting, steady development almost linear and as you can see but it made me notice that I am almost near my 1000 mark!! when I reach it then I will have an excuse to celebrate and give a nice "1000 SVN passed mark present".

Sunday, April 13, 2008

Linux Cafe in Akihabara

Have been in Akihabara (Electric Town) several times but never saw this shop before:


If you read the details below the logo you will see this shop is been there since 2001!! and I never saw it... I must go check my eyes. Anyway if you are an Open Source person walking around Akihabara you may well pass a get yourself a nice cup of open source coffee.

Wednesday, April 09, 2008

Simple Mail Server (Kubuntu)

If you need a small personal mail server to send log reports and system alarms from your Kubuntu machines to a local and/or external mail address then you may use Exim4 that is the default mail server (MTA) that comes with (K)Ubuntu.

To install is very easy:


1 sudo aptitude install exim4 exim4-base


and to configure simply run:


1 sudo dpkg-reconfigure exim4-config


and in the first dialog (image below) select "internet site". For all next options I used the defaults that would allow local users and services to send emails locally and to remote addresses (i.e. gmail accounts).


Now to test the new server you can send a simple email to your Gmail account:


1 mail -s test mygmail@gmail.com

2 test mail

3 .

4 Cc:


The "-s" switch is the mail subject. After the command simply type whatever you want in the mail body. To finish the email press followed by a dot "." and then again. After this you will be prompted with "Cc:" so press and then check your Gmail account. You should have received an email with the message and subject you used above.

Now say you want to receive LogWatch reports or any other mail directed to root in your Gmail account. Then you can simply create an alias in the "/etc/aliases" file like:


1 # Added by installer for initial user

2 root:   mygmail@gmail.com


then rebuild the aliases database


1 sudo newaliases


If you require more complex mail configurations you may check my previous posts about Sendmail and Postfix setup in (K)Ubuntu here.

Friday, April 04, 2008

Get latest ffmpeg (svn) in FreeBSD-7.0

If you want to compile the latest ffmpeg from subversion with some external libraries support like x264, faac, Theora and Vorbis in the latest FreeBSD release (7.0) then follow this simple steps:

If you do not have the ports tree installed (i.e. /usr/ports is empty or non existent) then you can use portsnap to download and update it (these commands must be done as root):


1 pkg_add -r portsnap

2 mkdir /usr/ports

3 portsnap fetch

4 portsnap extract

5 portsnap update


Install some ports to enable more funcionality in ffmpeg (these commands also must be done as root):


 1 # faac support

 2 cd /usr/ports/audio/faac

 3 make install clean

 4

 5 # vorbis support

 6 cd /usr/ports/audio/vorbis-tools

 7 make install clean

 8

 9 # x264 support

10 cd /usr/ports/multimedia/x264

11 make install clean

12

13 # theora support

14 cd /usr/ports/multimedia/libtheora

15 make install clean

16

17 # ffplay support

18 cd /usr/ports/deve/sdl12

19 make install clean


Checkout ffmpeg from subversion, configure, compile and install (only the last command needs root priviledges);


 1 # checkout ffmpeg from subversion

 2 svn co svn://svn.mplayerhq.hu/ffmpeg/trunk ffmpeg

 3 cd ffmpeg

 4

 5 # export library and include paths

 6 # so configure can find the external

 7 # libraries (i.e. x264)

 8 export LIBRARY_PATH=/usr/local/lib

 9 export CPATH=/usr/local/include

10

11 # run configure with desired options

12 ./configure --enable-gpl --enable-pthreads \

13  --enable-shared --enable-swscale  \

14  --enable-libx264 --enable-libfaac \

15  --enable-libtheora --enable-libvorbis \

16  --enable-encoder=g726 --enable-encoder=ljpeg \

17  --enable-encoder=mjpeg

18

19 # compile using GNU Make (gmake), not BSD Make

20 gmake

21

22 # install

23 su root -c 'gmake install'


If you want to enable other external codec libraries supported by ffmpeg make sure to install their respective ports (if available) and then run the configure script with the desired libraries enabled. You can see a list of supported codec libraries with ".configure --help".

Note that this instructions were tested with revision 12684 of ffmpeg subverion but ffmpeg is a very active project and this instructions are not guarantee to work with the latest subversion revision.

Thursday, April 03, 2008

Japanese Input in KDE 4.0.3 (Anthy)

So you want to try the newest and greatest KDE 4.0.3 release but you can't because you need to be able to write other languages other than English like in my case Japanese, Chinese and/or Korean??

After googling I found here that there is a scim input method that allows input of these languages in KDE4 and also fixes some problems with proprietary software like Skype, Adobe Reader, etc.

This input method is called scim-bridge and can be easily installed in Kubuntu with the command:

sudo aptitude install scim-bridge-agent scim-bridge-client-qt4 scim-bridge-client-qt scim-bridge-client-gtk

Then to enable scim-bridge as your input method you can use im-switch:

im-switch -s scim-bridge

or if you do not have im-switch then you can do it manually with:

sudo ln -sf /etc/alternatives/xinput-all_ALL /etc/X11/xinit/xinput.d/scim-bridge


Seems that scim-bridge is now the default input method in Ubuntu/Kubuntu but not sure, see resources below to get more detailed explanation on how to setup SCIM in Ubuntu.

https://help.ubuntu.com/community/SCIM
https://help.ubuntu.com/community/SCIM/Kubuntu
https://wiki.ubuntu.com/InputMethods/SCIM/Setup

Monday, March 03, 2008

Developing Android in Netbeans

Anyone who reads this blog would know that I like Netbeans a lot for mobile development (see here, here, here and here) and when I found that Google's mobile platform (Android) does not have a Netbeans plugin I was very disappointed.

Of course Netbeans enthusiasts developed a plugin (Undroid) but it is not supported by Google, I could not get it to launch the emulator directly from the IDE and currently it does not work with the latest Android SDK so still we do not have a full solution for Android development in Netbeans.

Now if you don't mind working in a mixed setting using Android tools from command line and using Netbeans to code, compile and install your Android applications then here is how you can do it.

Prerequisites

I assume you have the latest Netbeans 6.0.1 already installed and the latest Android SDK m5-rc14 also installed in your computer. I have tested this configuration in my Linux (Kubuntu) machine but should also work in Windows and other Linux distributions.


Creating a new project

The first thing is to create a new project using the activityCreator.py script that comes with the Android SDK:

activityCreator.py --out HelloAndroid org.piaotech.android

this script will create the project skeleton and more important the build.xml file that can be used by Netbeans to build/install your Android applications.


Start Netbeans and create a new "Java Project with Existing Ant Script" as shown in the figure above. In the next screen browse the location of the project directory created by the activityCreator.py script (HelloAndroid above) and the rest of the fields will be filled automatically by Netbeans. You can change the project name if you wish but the default is ok.


In the next screen (figure above) select the Ant tasks that each of the Netbeans commands should execute. I simply put compile for Build Project and install for Run Project.


In the last screen make sure to add the src and res of the project to the Source Package Folders as shown above.


finally select Java Sources Classpath in categories and add the doc directory that is inside the Android SDK as shown in the picture above and press finish.

Running you project

Now you should have your new Android project in Netbeans project view and now you can code and build it as you would using any other Netbeans project. Now if you try to run the application you will get an error indicating that there is no device. This is because I still have not found a way to launch the emulator from within Netbeans so we must launch it manually. From the command line run the emulator:


android-sdk_m5-rc14_linux-x86/tools/emulator


now with the emulator running if you run your project from within Netbeans the Android application will be automatically installed in the emulator.


It takes some effort to setup an Android project in Netbeans and actually there is no benefit from doing this as any java editor with support for Ant scripts can do the same. In my case is simply a matter of preference as all my Java projects are in Netbeans I did not want to have a separate project format only for Android applications.

Note that there is no need to close the emulator each time you rebuild your application so leave it running during the time you are developing. I also recommend you set up a console running the adb logcat command so you can see all the debugging messages (Log.v()) that Android throws.

Saturday, February 23, 2008

Friday, February 22, 2008

Reduce GIF size using RMagick

If you are creating GIF images using RMagick and your application has very stringent size restrictions (i.e. mobile devices) then this post may help you get the most of RMagick.

While it is possible to control the compression of JPEG and PNG files using the quality parameter for GIF files we are left with almost no options. Fortunately a little understanding of the default, and only, compression scheme used in GIF can help you improve the compression performance of your images.

The LZW compression algorithm used in GIF images and developed by Abraham Lempel, Jakob Ziv and Terry Welch, contructs a color table for an image wherein each color value is matched to a pixel. Thus, images with large areas of one color will be compressed far better than those that those that do not have such color blocks.

So to get better compression (smaller images) we must ensure we have large contiguous blocks of the same color in our image. When creating images in ImageMagick we can use these tips to ensure small size results:

First: Make use simple graphics with flat colors (i.e. avoid using Magick::GradientFill).

Second: when using an RMagick::Draw object always make sure you call the stroke_antialias(false) method on it:


1 require "RMagick"

2

3 gc = Magick::Draw.new

4 gc.stroke_antialias(false)

5

6 # your drawing code below


Third: When writing text using the annotate method from the Magick::Draw or Magick::Image classes do not use text antialiasing:


1 require "RMagick"

2

3 gc = Magick::Draw.new

4

5 gc.annotate(img,...) {

6   self.text_antialias = false

7 }


A very simple method to reduce the image size is using the despeckle filter on the image. This will reduce the color dither making the color distribution more planar so we have larger portions of the image with the same color. By doing this the LZW algorithm can reduce the final image size up to a 20% of the original size depending on the image.


1 require "RMagick"
2     
3 small_image = big_image.despeckle
4 small_image.write("small_image.gif"){
5     self.compression = Magick::LZWCompression
6     self.dither = false
7 }


Actually calling self.compression is not needed as it is set by default by RMagick but is good just to make sure.

Resources
http://rmagick.rubyforge.org/
http://www.faqs.org/faqs/jpeg-faq/part1/section-9.html
http://rmagick.rubyforge.org/src_over.html
http://www.webdevelopersnotes.com/graphics/gifs_compression_algorithm.php3

Monday, February 18, 2008

Using ActiveRecord with Microsoft SQL Server (MSSQL)

There seems to be a lot of confusion on how to use ActiveRecord from Ruby on Rails to query a MSSQL (Microsoft SQL) Database. During my last two projects I had to research this topic and found that this confusion stems from the fact that the documentation is sparced all over the web and most of the time it is incomplete and misleading.

After some tests and real projects I found there are mainly two ways to get ActiveRecord working with a MSSQL Database server: (1) Using the ADO driver and (2) using an ODBC driver. How these methods are used differ if we are in a Windows client or in a Linux client so we get a total of four different ways to connect ActiveRecord to MSSQL, in fact I only got three as we will see later, but in theory there can be four if I get ADO to work in Linux.

The confusion most people new to this topic confront is that the documentation found in the web usually mention these methods separately and without much detail on the configuration. For example some pages in the web explain how to connect to MSSQL using the ADO driver but they don't mention that this works only if you are using a Windows client where win32ole can be installed. Some others talk about success using ODBC and present the configuration but do not explain how to create the DSN needed for connection because they assume this is common knowledge (it was not for me).

To avoid the pain I had to suffer when getting my work done to others, here I present my experiences in this topic in four subsections. Each one explains how to use the ADO or ODBC methods from a Windows or Linux client.

Windows Client using ADO driver

I have tested this configuration using a WinXP Home client with the ruby one click installer (184-20 and 186-26) connecting to a Windows Server 2003 running Microsoft SQL Enterprise 2000 SP3.

To start download an extract the ruby-dbi package (dbi-0.1.1.tar.gz) somewhere in your Windows machine.

The following instructions are to be executed from within a command shell (cmd.exe).


1 gem update --system

2 gem install activerecord-sqlserver-adapter --source=http://gems.rubyonrails.org

3 mkdir c:\ruby\lib\ruby\site_ruby\1.8\DBD\ADO

4 copy ruby-dbi\lib\dbd\ADO.rb c:\ruby\lib\ruby\site_ruby\1.8\DBD\ADO


These commands simply update the RubyGems system and install the Active Record gem with all dependencies needed to connect to MSSQL. We then copy the ADO driver from ruby-dbi inside our ruby install directory. If you have ruby installed in a place other than "c:\ruby" make the appropiate changes to the commands above.

Now in your code you can connect to the MSSQL database using the following:


1 ActiveRecord::Base.establish_connection(

2     :adapter => "sqlserver",

3     :mode => "ADO",

4     :username => "youruser",

5     :password => "yourpass",

6     :host => "serverhostname_or_ipaddress",

7     :database => "YourDbName"

8 )


I have tested this configuration with ActiveRecord version 1.14.4 and 2.0.2 but I assume this should work with all version in between too.

Windows Client using ODBC

I have only tested this with the latest ActiveRecord 2.0.2 so I don't know if this works with previous versions and using a WinXP Home client with the ruby one click installer (184-20 and 186-26) connecting to a Windows Server 2003 running Microsoft SQL Enterprise 2000 SP3

The following instructions are to be executed from within a command shell (cmd.exe).


1 gem update --system

2 gem install activerecord-sqlserver-adapter --source=http://gems.rubyonrails.org


As with the ADO driver these commands simply update the RubyGems system and install the ActiveRecord gem with all dependencies needed to connect to MSSQL.

The next step is where most documentation I have seen fails. They say you must specify a DSN to connect via ODBC but they do not mention what this DSN is or where to get it. I guess these gurus assume we must know this things or we would not be looking for this info but in my case it took me a while to figure out where this DSN thing is supposed to come from.

The DSN (Data Source Name) must be created and in Windows we do it by using a tool called "odbcad32.exe" or choosing "Data Sources (ODBC)" from the "Administrative Tools" inside Windows "Control Panel". For instructions on how to use this tool refer to the detailed explanation at www.truthsolutions.com.
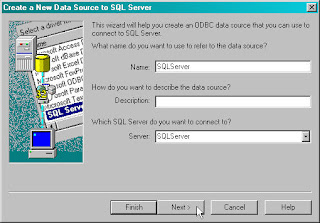


When creating the new DSN make note of the name you set on it (see figure above) because this is the name you must use to connect to the MSSQL server when using ActiveRecord. Also make sure you select the "SQL Server" driver as instructed at www.truthsolutions.com. The authentication method depends on how you have your MSSQL server configured but I always use the using Login and Password entered by the user option so I don't know about the network login ID option. At the end make sure you test the DSN to make sure it is valid and is working.

Once the DSN is created you can connect to the MSSQL server using ActiveRecord like:


1 ActiveRecord::Base.establish_connection(

2     :adapter => "sqlserver",

3     :mode => "odbc",

4     :username => "youruser",

5     :password => "yourpass",

6     :dsn => "SQLServer"

7 )


and make sure to replace "SQLServer" with the DSN name you set up when creating it using the "odbcad32.exe" tool.

Linux Client using ODBC

The following instructions were tested in Kubuntu Gusty (7.10) using the latest ActiveRecord 2.0.2 as client connecting to a Windows Server 2003 running Microsoft SQL Enterprise 2000 SP3.

From console install the following packages:


1 sudo aptitude install ruby1.8 unixodbc tdsodbc libodbc-ruby1.8 rubygems


Next you can choose to install ActiveRecord using Ubuntu repositories or using RubyGems repositories. I chose to use RubyGems as this provides the latest versions and is updated more often.


1 sudo gem install activerecord-sqlserver-adapter --source=http://gems.rubyonrails.org


Now as in Windows we must create a DSN for unixODBC. The first step is to add the freeTDS driver to unixODBC and to to this we create a configuration file (simple text file) called for example "myodbcdriver.ini" that contains:


1 [FreeTDS]

2 Description     = TDS driver (Sybase/MS SQL)

3 Driver          = /usr/lib/odbc/libtdsodbc.so

4 Setup           = /usr/lib/odbc/libtdsS.so

5 CPTimeout       =

6 CPReuse         =


If you are not using Kubuntu/Ubuntu then make sure you have installed unixODBC and the freeTDS ODBC driver and change the "Driver" and "Setup" paths to reflect your system installation. In Kubuntu the "tdsodbc" package we installed above provides us with this configuration file in "/usr/share/tdsodbc/odbcinst.ini" so we do not need to create it.

With this configuration we can add the freeTDS driver to unixODBC by issuing the following command:


1 sudo odbcinst -i -d -f myodbcdriver.ini


or in Kubuntu that provides the configuration file


1 sudo odbcinst -i -d -f /usr/share/tdsodbc/odbcinst.ini


Next we must create a DSN configuration file, say mydsn.ini, that looks like:


1 [SQLServer]

2 Driver      = FreeTDS

3 Description = My First SQLServer Database

4 Trace       = No

5 Server      = hostname_or_ipaddress

6 Port        = 1433

7 Database    = SQLServerDB


As in Windows take note of the name you set to the DSN ([SQLServer]) as this is used for the connection. Finally we add the DSN to unixODBC with the following command:


1 odbcinst -i -s -f mydsn.ini -h


Note that we execute this command without the "sudo" because we are installing a User DSN that will be accessible only to the system user that installed the DSN. To install a system wide DSN we use a similar command but with the "-l" switch instead of the "-h".


1 odbcinst -i -s -f mydsn.ini -l


You can run the odbcinst command without any arguments to get a list of possible options. To test the newly created DSN we can use the isql command tool that comes with unixODBC:


1 isql SQLServer username password


replacing SQLServer with the name you used when creating the DSN and if everything is working you should get a message similar to:


1 +---------------------------------------+

2 | Connected!                            |

3 |                                       |

4 | sql-statement                         |

5 | help [tablename]                      |

6 | quit                                  |

7 |                                       |

8 +---------------------------------------+

9 SQL>                              


input "quit" to exit the SQL prompt. As in Windows, once the DSN is created you can connect to the MSSQL server using ActiveRecord using:


1 ActiveRecord::Base.establish_connection(

2     :adapter => "sqlserver",

3     :mode => "odbc",

4     :username => "youruser",

5     :password => "yourpass",

6     :dsn => "SQLServer"

7 )


again make sure to replace "SQLServer" with the DSN name you set up when creating it.
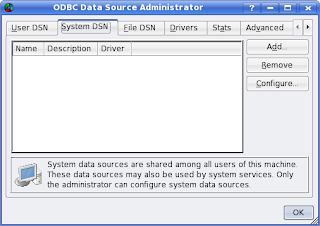


Some notes about the Linux to MSSQL connection:


  • There are GUI based tools similar to "odbcad32.exe" in Windows that allows you to manage DSN's and ODBC drivers more easily. In Kubuntu simply install the "unixodbc-bin" package and then execute "OBDCConfig". As you can se from the image above this tool is quite similar to the Windows counterpart.

  • The freeTDS driver is free and even thought it is rather stable I have found some small issues specially when working with non-ascii character sets like SJIS and ISO-2022-JP used in Japanese OSes. There is a commercial alternative driver produced by EasySoft in case you need commercial support and reliability.

  • There is another implementation of ODBC in Linux called iODBC but have never used it. It may be interesting to test the Windows ODBC, unixODBC and iODBC in performance.


Linux Client using ADO driver

So far I have been unable to make this configuration work. It seems that the ADO driver uses some components from the win32ole library that is only available in Windows machines. This means the only way to connect to a MSSQL server from a Linux client is using the unixODBC/freeTDS driver method described before.

If someone knows of other ways to make Linux communicate with a MSSQL database please let me know.

Resources

http://softiesonrails.com/2006/6/28/activerecord-with-sqlserver-without-rails
http://www.imarichardson.com/
http://www.themolehill.com/
http://www.freetds.org/
http://www.unixodbc.org/
http://www.unixodbc.org/doc/FreeTDS2.html
http://www.truthsolutions.com/sql/odbc/creating_a_new_odbc_dsn.htm
http://josiah.ritchietribe.net/blog/archive/2006/01/1176/

RubyGems Explicit Versioning

One of the most useful features of RubyGems as a package manager is the ability to force explicit versions of the packages in your ruby code. Unfortunately worst than not being documented this feature is wrongly documented even in RubyGems own manual pages.

So for the record here is how to tell your ruby code to use a specific gem version:

For RubyGems version < 0.9.4 we use:


1 require 'rubygems'

2 require_gem 'mechanize','=0.4.7'

3 require 'mechanize'


What we do is call "require_gem" to set up the version we want and then load the gem using "require".

After RubyGems 0.9.4 onwards the "Kernel#require_gem" method was deprecated and replaced with "Kernel#gem". So if you have the latest RubyGems the code above becomes:


1 require 'rubygems'

2 gem 'mechanize','=0.4.7'

3 require 'mechanize'


Instead of using "=0.4.7" it is also possible to use "<0.4.7" or ">0.4.7" if the specific version is not required.

We can be more professional and make our scripts handle both cases above using the Gem::RubyGemsVersion constant:


1 require 'rubygems'

2 if Gem::RubyGemsVersion < "0.9.4"

3     require_gem 'mechanize','=0.4.7'

4 else

5     gem 'mechanize','=0.4.7'

6 end

7 require 'mechanize'


This way our code will (hopefully) work with all versions of RubyGems.

References:
http://redhanded.hobix.com/inspect/autorequireIsBasicallyGoneEveryone.html
http://piao-tech.blogspot.com/2006/11/tips-on-rubygems-installation-and.html

Tuesday, February 12, 2008

Per user Latex style and bst files

Easy way to tell latex where to look for custom sty, cls and bst files:


1 # The double slash at the end means recursive.

2 export BSTINPUTS=.:~/.latex//:

3 export BIBINPUTS=.:~/.latex//:

4 export TEXINPUTS=.:~/.latex//:


Change the path to reflect your system and make sure to include the current dir "." in the list of paths or latex won't be able to find the tex files in the current directory.

Monday, January 07, 2008

Reset Master Password in Thunderbird 2.0.0.9

For some mysterious reason the master password of Mozilla Thunderbird got set in my wife's computer (Windows XP) and every minutes a dialog box would pop up asking for it. Of course no one knew what the master password was so using Thunderbird in that machine was starting to get annoying.

After searching in Google I found two solutions: one consisted in create a new profile and transfer the mail data from the problematic profile to the new one.This solution required too much effort for my liking. The second solution that everybody said would not fail was running the following command:

"C:\path to thunderbird\thunderbird.exe" -chrome chrome://pippki/content/resetpassword.xul

Unfortunately for me this command never worked no matter what I did and as this forum thread shows I am not alone so I assume is a Thunderbird problem and not mine. I even tested the command in two different machines one with a clean Windows installation and I can assure this command does not work!.

So a little more research showed me that the passwords are stored in a file called key3.db that resides inside the mail profile folder. If you don't know where is your profile folder check this link.

So I simply closed Thunderbird and renamed the "key3.db" file to "key3.db.bak" and started Thunderbird. And that was it... all passwords were gone but also the annoying master password was gone too.

If you need to reset your master password for any reason and you do not care loosing the already stored passwords (web account passwords) then this is the simplest method to do it.

Thursday, December 27, 2007

Shade windows in KDE using double click in the title bar

In KDE using compiz-fusion to shade the current active window we need to press Ctrl+Alt+s that is not a very easy thing to do specially in small keyboards (i.e. laptops).

Another way to shade windows is by double clicking in the window title bar but for this to work we must first enable it in kwin by editing the file: ~/.kde/share/config/kwinrc. Inside this file after the section [Windows] simply add the following line:


TitlebarDoubleClickCommand=Shade


Now after you have restarted you KDE session you will be able to shade windows by double clicking their title bars.

Sunday, October 21, 2007

How to fix the "Warning: Unable to load the OpenGL" error in Matlab

If you use Matlab in K/Ubuntu and you get a warning message like "Warning: Unable to load the OpenGL" everytime you start Matlab it means you are not using the powerful OpenGL rendering engine to draw your plots.

This may not be a big problem as Matlab will work as expected but if you have a 3D accelated graphics card (ATI or NVidia) then you could greatly benefit from having Matlab use the OpenGL renderer. Even without a 3D accelerated graphics card I would say that using OpenGL for rendering is a plus.

So solve this problem you simply need to remove a file (libgcc_s.so.1) from the Matlab install directory in order for it to use the one in the system that has correct links to the OpenGL libraries.

Find the file inside $MATHROOT/sys/os/glnx86 and move it to another place like:

mv libgcc_s.so.1 libgcc_s.so.1.old

Restart Matlab and the warning message should have dissapeared and the command "opengl info" should give and output like:

Version = 2.0.6473 (8.37.6)
Vendor = ATI Technologies Inc.
Renderer = ATI MOBILITY FireGL V3200
MaxTextureSize = 2048
Visual = 0x29 (TrueColor, depth 24, RGB mask 0xff0000 0xff00 0x00ff)
...

The output may vary depending on your graphics card or if you have accelerated or non-accelerated (i.e. Mesa) OpenGL graphics.

Wednesday, August 01, 2007

Dealing with Errno::EBADF in ruby net/http

In August 2006 I posted a question in a forum about an error (Bad File Descriptor) I was getting when using the net/http library of Ruby. Today, almost one year latter, I received an email from someone with that same problem asking for my advice and a few hours latter the same person wrote again saying he found a satisfactory solution and wanted to share it with me.

As part of this wonderful online community I am obliged to share my new knowledge in hopes it is useful to others as it was useful for me.

The Bad File Descriptor error (Errno::EBADF) occurred sporadically while using the net/http library to connect to a lot of pages (web spider) in a short time span. The main problem was that I could never catch that error (i.e. rescue it) and the script would not finish leaving a lot of pages without processing. To solve this problem at the time I split my script is several smaller ones and added a small delay between web pages.

My solution works but that small delay for a thousand pages add up and the scripts take not minutes but hours to finish.

The email I got explained that the cause of this error is that the operating system (Win XP) is running out of TCP ports for new connections. Many of the sockets open are put in TIME_WAIT state (meaning that the client has closed but the server has yet to close from its side).

The first approach to solve this is to force Ruby to close the connection but there is no such facility, at least in Ruby 1.8.x, for doing it. The second solution and the one I received by mail was to increase the upper range of dynamically allocated to client TCP/IP connections to a value.

Here are the instruction on how to do it:
http://msdn2.microsoft.com/en-us/library/Aa560610.aspx

If you expect to make a lot of http connections fast using Ruby in a Windows XP machine then you better increase that number of ports or you will be around asking yourself what this random EBADF error is all about.

Tuesday, June 26, 2007

Doja Development in Netbeans


Back in October 2006 I wrote a three part post (one, two and three) on how to develop mobile applications for Japanese phones using Netbeans as IDE. When I say Japanese phones I refer to phones provided by the three major cellular network providers in Japan: KDDI, Softbank and NTTDoCoMo.


Recently I was assigned a new project that requires the implementation of a Doja IApplication for the 903i release of NTTDoCoMo phones. Since these phones support Doja-5.0 profile I started to add support for it into my Netbeans installation and in the way I decided also to upgrade to Java-6u1 and Netbeans 5.51.

After some time setting all up I can say it was worth the effort and this new set up is cleaner and more easy than my previous one. For those interested here is my set up.


Pre-requisites


If you want to upgrade to Java-6u1 I strongly recommend you to uninstall all other instances of Java on your system. I had a lot of rare problems until I removed the previous Java 1.4.2 from my system. Uninstall Netbeans and the mobility pack if you have it.

Also uninstall all previous Doja toolkits you may have as they are all included in the Doja-5.0 toolkit.

Download and install Java SDK, Netbeans, Netbeans Mobility Pack and the Doja Toolkit-5.0 in that order. Here are the links:

  • Java Development Platform 6u1. link

  • Netbeans and Mobility pack link

  • Doja Toolkit 5.0. link


Doja Netbeans Pack


Once you have all installed you can download my Doja Netbeans pack (doja-netbeans.zip) that contains some needed configuration files and a single ant task that we will use to generate the JAM file and a nice download html file that are needed for deploying IApplications.

To use the Doja Netbeans Pack you need to do some manual work. First uncompress the zip file and you will see three files:

  • Doja.xml - Contains Doja profile configurations.

  • build.xml - Build script that creates JAM and HTML files for IAppli deployment

  • doja-ant-tasks.jar - My custom ant task used by the build script to create the JAM and HTML files


Adding the Doja Emulator Platform to Netbeans

Make sure Netbeans is not running and copy the Doja.xml configuration file inside your users .netbeans platform configuration directory. This directory is usually:

c:\Document and Settings\username\.netbeans\5.5.1\config\Services\Platforms\org-netbeans-api-java-Platform\


After you have copied the Doja.xml file to the correct directory you must open it and edit the platform home element. Simply look at the top of the file the xml tag and change the home="C:\install_path\iDKDoja5.0" with the directory were you installed the Doja toolkit. If you choose default installation when installing the Doja toolkit then you should put home="C:\iDKDoja5.0".

If everything is ok then when you start Netbeans and create a new Mobile Application you should be able to select the NTT Doja Emulator Platform and one of the FOMA devices. Each device uses an specific Doja Profile version:

  • FOMA904i - Doja-5.0

  • FOMA903i - Doja-5.0

  • FOMA902i - Doja-4.1

  • FOMA901i - Doja-4.0

  • FOMA900i - Doja-3.5

  • FOMA506i - Doja-3.0

  • FOMA505i - Doja-3.0


You must choose the device depending on what Doja profile the device you are developing for supports. A list of devices and the Doja version they support is available at NTTDoCoMo home page here .

If you don't see the Mobile Application option when creating a new project make sure you have installed the Netbeans Mobility Pack correctly. If you are able to create Mobile Application projects but you don't get the NTT Doja emulator platform make sure you have copied the Doja.xml file in the correct place and edited the home property correctly.
Setting up the Doja ant task

Create a new Mobile Application using Netbeans and once created replace the project's build.xml file with the one that came with the Doja Netbeans pack. This modified build.xml script should look like:

<?xml version="1.0" encoding="UTF-8"?>
<project name="" default="jar" basedir=".">
<description>Builds, tests, and runs the project .</description>
<import file="nbproject/build-impl.xml"/>


<property name="jam.AppClass" value="HelloNtt" />
<property name="jam.AppName" value="HelloNtt" />
<property name="jam.PackageURL" value="http://test.mydomain.org" />
<property name="jam.Network" value="http" />
<property name="jam.SPSize" value="1024" />


<taskdef name="jamwriter" classname="jp.doja.ant.JamTask">
<classpath>
<pathelement location="C:\path_to_jar\doja-ant-tasks.jar"/>
</classpath>
</taskdef>

<target name="post-jar">
<jamwriter />
</target>

<target name="run" depends="init,jar">
<exec executable="${platform.home}/bin/doja.exe" dir="${dist.dir}">
<arg value="-i" />
<arg value="${name}.jam" />
</exec>
</target>

<target name="post-clean">
<delete file="${dist.dir}/${name}.jam"/>
</target>
</project>

For this build script to work you must search for the tag inside the jamwriter taskdef and modify the location to point to the doja-ant-tasks.jar file that came with the Doja Netbeans Pack. Simply said modify the "C:\path_to_jar\doja-ant-tasks.jar" line to point to the place that file is located in your computer.

This custom task will create the needed JAM descriptor file and an HTML file you can use to deploy your IApplis. The most relevant entries that go inside the JAM file are already on the build.xml script:

<property name="jam.AppClass" value="HelloNtt" />
<property name="jam.AppName" value="HelloNtt" />
<property name="jam.PackageURL" value="http://test.mydomain.org" />
<property name="jam.Network" value="http" />
<property name="jam.SPSize" value="1024" />

You can add as many entries as you like by simply creating a new tag with the name starting with "jam." followed by the actual property name and the value set to the entry value. If you do not understand what the JAM descriptor file is or what properties are available refer to this tutorial at the Doja Developers Network. Again the most used ones are the ones presented above.
Final Remarks

Well we are finished. Now we can create Doja IAppli's easily in Netbeans taking advantage of all the tools Netbeans has to offer for that purpose. We get automatic preverification, several levels of ofuscation, packaging, JAM and download HTML files creation (via custom ant task) and most important device fragmentation control. Actually the only reason I like to use Netbeans for J2ME/Doja development rather than using the native Doja Toolkit or Eclipse is because Netbeans has a nice preprocessor that makes it easy to deal with the device fragmentation problem.

To test this setup you can refer to my previous blog post on the topic (see links at the beginning of this post).

Saturday, June 16, 2007

Skype Linux is comming fast!!


When the new 1.4.0.74 release of Skype was released with Feisty Fawn binary packages and a repository I simply jumped in and installed Skype on my system using those repositories.

Happy with the new release I fired up Skype to be greeted with my old friend, the ***glibc detected *** bug.

Sad for the step back I started to read the FAQ on how to report a bug and when I was about to submit the report the little apt-get update icon appeared on my systray. I clicked and saw that a new version of Skype was available to install... that was fast!! . A couple of clicks and I had the new 1.4.0.74-1 release installed and the what is better the bug was gone!. Skype runs just perfect and looks great on my laptop now. At this speed I expect video support to be here very soon.

Thursday, May 31, 2007

Komodo - Japanese Encodings


If you are considering Komodo Edit as editor and you work for a Japanese company you should be aware that the default installation of Komodo does not support Japanese text encodings like cp932 (Windows), EUC-JP and Shift-JIS.


Fortunately by modifying some configuration files we can make Komodo Edit to recognize and render these text encodings correctly (ref1 and ref2). The configuration file you need to modify is called "koEncodingServices.py" and the location depends on the OS you are using:


In Mac the file is located in

Komodo IDE.app/Conten­ts/MacOS/compo­nents/koEncodin­gServices.py

In Linux and Windows the file is located in

${INSTALL_DIR}/lib/mozilla/components/koEncodin­gServices.py

Change ${INSTALL_DIR} with the root path were you installed Komodo Edit in you machine.


Close Komodo Edit and using you next favorite text editor open the file and in line 81 add the following three lines (see screenshot):


('EUC-JP', 'EUC-JP', 'EUC-JP', '', 1, 'EUC-JP'),
('Shift_JIS', 'Shift_JIS', 'Shift_JIS', '', 1, 'Shift_JIS'),
('cp932', 'Japanese (cp932)', 'CP932', '', 1,'cp932'),

Impressions

The only thing I liked about it is the ability to make it feel like Vim using some key bindings with project management enhancements. This only reason was not good enough to make me switch and soon I was back to my Command Prompt + Vim + muCommander in Windows and yakuake + Vim + Konqueror in Linux.


Komodo felt too cluttered and was way too slow to start and edit with specially on Linux. Finally if you decide to use Komodo Edit for any reason you may as well change the default fonts as they are not too good for programming tasks. You can find the best fonts for programming here. From the list my favorites are the Bistream Vera Sans Mono and Dina Fonts that look rather good on Linux and on Windows as well.

Wednesday, April 25, 2007

Synergy Japanese Keyboard Support (Kana key)

For the impatient:

I patched and compiled Synergy to enable the Kana key used in Japanese keyboards to switch between input methods. I also created the Windows installer for the patched version for those Windows users that do not know what a patch is or what compiling means. You can find the installer here.

Unfortunately for Linux users I have no idea on how to create packages for any distribution so you will have to compile from sources. Fear not as it is not complicated at all and I explain how to do it below.


A dual screen hack (revisited):

In one of my previous post I talked about how I used X2VNC/Win2VNC in combination with RealVNC/X11VNC to share a single keyboard and mouse between several computers even if these computers had different operating systems.

Using the above programs works well but I have been experiencing some problems like not being able to use the Japanese keys on my keyboard and some responsiveness degradation (late mouse reaction) when the machine running the VNC server is under heavy load.

Due to these small problems I started looking for an alternative and found Synergy. This application is small and does not require the additional VNC server. Runs in Windows, Linux and Mac and the transition between screens is smooth even if the computers are under heavy load. Another thing I like a lot is the centralized configuration (only one server) that allows to easily configure more than two computers. Creating a setup with more than three computers using X2VNC/WIN2VNC could be very frustrating. Also there are GUI configuration tools for Windows, Linux and Mac that make even easier to setup (here).

There are a lot of resources in the Internet that explain how to install and use Synergy to create dual screen systems (here, here and here) so I wont explain it here. What I will explain is how to get the Japanese keys to work with synergy.

Some videos of Synergy in action can be found here

Japanese Key's support in Synergy

The current version of Synergy does not handle the Japanese keys used to change the input method (i.e. ローマ字/漢字). There is a Japanese keyboard (Hankaku/Zenkaku-Kanji and Kana key) patch in the patches section of the Synergy sourceforge page but no binary releases are available yet. I took the time to patch and compile the source code to enable these keys on my Japanese keyboard in Linux and Windows and here are the instructions on how I did it.

Instructions for Linux Kubuntu Desktop

1. Download the source code from here. The last version was 1.3.1 at the time of this writing.

2. Make sure you have installed the development tools and the XTest development package

sudo aptitude install build-essential
sudo aptitude install libxtst-dev

3. Unpack and edit the source code

tar xvfz synergy-1.3.1.tar.gz
cd synergy-1.3.1

4. Edit the source code to add Hankaku/Zenkaku-Kanji and Kana key support

Open the lib/platform/CMSWindowsKeyState.cpp file and search the following three lines:

/* 0x0f2 */ { kKeyNone }, // OEM specific
/* 0x0f3 */ { kKeyNone }, // OEM specific
/* 0x0f4 */ { kKeyNone }, // OEM specific

and replace them with these corresponding lines

/* 0x0f2 */ { kKeyOEMCopy }, // VK_OEM_COPY
/* 0x0f3 */ { kKeyZenkaku }, // VK_OEM_AUTO
/* 0x0f4 */ { kKeyZenkaku }, // VK_OEM_ENLW


Open the lib/synergy/KeyTypes.h file and search for a line like:

static const KeyID kKeyDelete = 0xEFFF; /* Delete, rubout */

and add the following below:

static const KeyID kKeyOEMCopy = 0xEF27; /* OEMCopy(Kana Key) */

Actually you can add this line of code anywhere you want inside the KeyTypes.h file but to keep things in order I add it after the kKeyDelete const declaration.

5. Make the configure/make/make install dance.


./configure -x-includes /usr/include -x-libraries /usr/lib --prefix=/usr
make
sudo make install


6. Synergy is now installed on your Kubuntu system and you can proceed to configure it. Refer to the links in the previous section for instructions.

Instruction for Windows

1. To compile Synergy in Windows you need Visual C++ (Express Edition) that can be downloaded for free from here.

2. To create the installer we need NSIS. Simply download the installable from here and install it.

3. Download the source code (synergy.1.3.1.zip), unpack it somewhere. Edit the file "dist/nullsoft/installer.mak" inside the source code to make sure it points to the correct NSIS installation path. Simply open the installer.mak file with any text editor and make sure the path for makensis is correct:

NSIS="C:\Program Files\NSIS\makensis"

This example is if you installed NSIS in the default path.

3. Open the synergy.dsw VC++ project. Say yes to all the requests to convert the project format and edit the source code as directed below

Open the platform->Source Files->CMSWindowsKeyState.cpp file and search these six lines:

/* 0x0f2 */ { kKeyNone }, // OEM specific
/* 0x0f3 */ { kKeyNone }, // OEM specific
/* 0x0f4 */ { kKeyNone }, // OEM specific

and replace them with these corresponding lines

/* 0x0f2 */ { kKeyOEMCopy }, // VK_OEM_COPY
/* 0x0f3 */ { kKeyZenkaku }, // VK_OEM_AUTO
/* 0x0f4 */ { kKeyZenkaku }, // VK_OEM_ENLW


Open the libsynergy->Header File->KeyTypes.h file and add the following line:

static const KeyID kKeyOEMCopy = 0xEF27; /* OEMCopy(Kana Key) */

just after this line:


static const KeyID kKeyDelete = 0xEFFF; /* Delete, rubout */

If you followed the Linux instructions you will note that these changes are exactly the same as does we did in Linux.

4. Make sure the compiler is set to Release configuration (i.e. select release in the project properties) and build the "all" and "installer" projects. To compile right click on the project names (all and installer) and select build from the context menu.

5. After both builds finish there will be a "SynergyInstaller.exe" file inside the "build" directory inside the source code directory. Execute this file to install Synergy as normal.

6. Proceed to configure (see references in previous section) and now you will be able to change from romaji to kana using the Kana key available on all japanese keyboards.

Mac Instructions

Unfortunately I do not have a Mac to try this patch but there are instructions on how to compile Synergy on a Mac inside the doc/compiling.html file. If someone is successful applying this patch on the Mac I would like to hear about it.

Sunday, April 22, 2007

Receive Log reports via Email (Ubuntu)

When deploying servers in the hostile Internet a good administrator is faced with the need to monitor all the log files the server produces to ensure it is working correctly and to detect any security treats.

This can be a really time consuming task as a busy server can produce several megabytes worth of log files per day and if there are more than one server, then checking log files one by one is totally impractical, not to say useless.

To alleviate the burden of checking big log files every day I installed logwatch and it has proven to be very useful. It gives a very complete summary of all your log files with the most relevant information and very well presented with per service sub-sections.

In Ubuntu Server installing the logwatch package worked out of the box for almost all my running services (Courier-POP, Postfix, OpenSSH). The relevant command is:

sudo aptitude install logwatch

The only service it did not work was the web server because logwatch is configured to use Apache log files by default while I use Lighttpd as web server.

How to Configure Logwatch to parse Lighttpd log files (Ubuntu)

The easiest way to customize logwatch is to create an override.conf file inside the /etc/logwatch/conf/ directory. To tell logwatch to parse lighttpd log files we create the override.conf file and add the following:

logfiles/http: LogFile = lighttpd/*access.log.1
logfiles/http: LogFile = lighttpd/*access.log
logfiles/http: Archive = lighttpd/*access.log.*.gz

This is assuming the lighttpd log files are inside "/var/log/lighttpd" directory. If they are not change the paths to reflect the location on your system. You can add as many log files as you want (i.e. virtual domains) by adding all three entries above for each log file.

Now you will get some nice reports about the web usage in your server. Make sure you read the HOWTO-Customize-LogWatch file to learn more about logwatch. This file is usually inside the "/usr/share/doc/logwatch" directory in .gz format. To read it you can use the command:

zcat /usr/share/doc/logwatch/HOWTO-Customize-LogWatch.gz | less


Get Logwatch reports to via email

By default Logwatch sends the reports it generates to root. To send the reports to a different local user or external email address you can edit the "/etc/aliases" file like:


1 # Added by installer for initial user

2 root:   myuser, mygmail@gmail.com


and then rebuild the aliases database:


1 sudo newaliases


In the example above all Logwatch reports will be received by the local user "myuser" so you may access the reports via the mbox file at "/var/mail/mysuer" and to the external address mygmail@gmail.com that you may read using the Gmail web interface.

Important Note: by default the mail transfer agent of (K)Ubuntu does not allow relay of messages to external addresses (i.e. gmail addresses). To change this you may follow the instructions to set a small personal mail server here.

Logwatch vs Logcheck

I installed both programs and for me Logwatch is far more useful than logcheck. Logcheck will only parse the log files related to security (i.e. auth.log) and simply send you and email with the access denied entries. The information Logcheck provides is no different that I get by looking at the log files directly.

Logwatch in the other hand provides relevant information not only about security issues but also from all the services running on the server. The information is well summarized and presented in a way it is easy to get a general and a detailed view of the server status and operation.

How to make Webalizer work with Lighttpd in Ubuntu server

To get more visually compelling statistics about your web server usage patterns you can use Google Analytics that is a powerful tool. But if you prefer a simpler alternative but still powerful enough then I recommend installing Webalizer.

In Ubuntu server if you are using Lighttpd instead of Apache make sure to change the configuration file (/etc/webalizer.conf) to point to the corresponding log file (i.e. LogFile /var/log/lighttpd/access.log.1) or it won't work.

Logwatch example report


################### LogWatch 7.1 (11/12/05) ####################
Processing Initiated: Thu May 31 06:25:02 2007
Date Range Processed: yesterday
( 20075月-30 )
Period is day.
Detail Level of Output: 5
Type of Output: unformatted
Logfiles for Host: makarena
##################################################################

--------------------- courier mail services Begin ------------------------

Connections: 100 Times
Protocol POP3 - 100 Times
Host 192.33.11.109 - 1 Time
Host 199.120.17.15 - 8 Times
Host 195.10.13.49 - 3 Times
Host 13.9.18.11 - 88 Times


Logins: 96 Times
Protocol POP3 - 96 Times, 3790856 Bytes
User paprika - 1 Time, 21511 Bytes
Host 14.8.13.19 - 1 Time, 21511 Bytes
User mondongolia - 88 Times, 3389830 Bytes
Host 13.9.18.11 - 88 Times, 3389830 Bytes
User juanito3 - 7 Times, 379515 Bytes
Host 124.10.17.1 - 6 Times, 379515 Bytes
Host 124.10.13.4 - 1 Time, 0 Bytes


---------------------- courier mail services End -------------------------


--------------------- Cron Begin ------------------------


Commands Run:
User root:
run-parts --report /etc/cron.hourly: 24 Time(s)
[ -d /var/lib/php4 ] && find /var/lib/php4/ -type f -cmin +$(/usr/lib/php4/maxlifetime) -print0 | xargs -r -0 rm: 48 Time(s)
[ -d /var/lib/php5 ] && find /var/lib/php5/ -type f -cmin +$(/usr/lib/php5/maxlifetime) -print0 | xargs -r -0 rm: 48 Time(s)
test -x /usr/sbin/anacron || run-parts --report /etc/cron.daily: 1 Time(s)

---------------------- Cron End -------------------------


--------------------- httpd Begin ------------------------

35.45 MB transferred in 2953 responses (1xx 0, 2xx 2766, 3xx 151, 4xx 36, 5xx 0)
1817 Images (9.34 MB),
17 Documents (11.90 MB),
867 Content pages (9.56 MB),
16 Redirects (0.00 MB),
236 Other (4.66 MB)

Attempts to use known hacks by 1 hosts were logged 1 time(s) from:
20.11.61.11: 1 Time(s)


A total of 1 sites probed the server
20.11.61.11

Requests with error response codes
404 Not Found
/%7Enbalan/JSP/: 1 Time(s)
/_vti_bin/shtml.exe/_vti_rpc: 1 Time(s)
/_vti_inf.html: 1 Time(s)
/comment: 2 Time(s)
/en/home/photo_gallery: 1 Time(s)
/en/user: 3 Time(s)
/favicon.ico: 2 Time(s)
/imagefile/filepath/1110/small/IMG_0189.jpg: 1 Time(s)
/imagefile/filepath/1112/small/IMG_0191.jpg: 2 Time(s)
/imagefile/filepath/1113/small/IMG_0192.jpg: 1 Time(s)
/robots.txt: 17 Time(s)
/~nbalan/Concurrency/html/CIC: 2 Time(s)
/~nbalan/Concurrency/html/index2.html: 1 Time(s)
/~shda/toppage.html: 1 Time(s)

A total of 9 ROBOTS were logged

---------------------- httpd End -------------------------

--------------------- pam_unix Begin ------------------------

cron:
Sessions Opened:
root: 121 Time(s)

sshd:
Sessions Opened:
admin: 3 Time(s)

su:
Sessions Opened:
(uid=0) -> nobody: 3 Time(s)


---------------------- pam_unix End -------------------------


--------------------- POP-3 Begin ------------------------


[POP3] Connections:
=========================
Host | Connections
------------------------------------------------------------- | -----------
::ffff:14.8.13.19 | 1
::ffff:13.9.18.11 | 88
::ffff:84.10.1.15 | 6
::ffff:8.10.13.9 | 1
---------------------------------------------------------------------------
96


[POP3] Logout stats (in MB):
============================
User | Logouts | Downloaded | Mbox Size
--------------------------------------- | ------- | ---------- | ----------
hbr | 7 | 0.36 | 0
admin | 1 | 0.02 | 0
sna | 88 | 3.23 | 0
---------------------------------------------------------------------------
96 | 3.62 | 0.00

---------------------- POP-3 End -------------------------


--------------------- postfix Begin ------------------------


3716764 bytes transferred
204 messages sent
204 messages removed from queue

Top ten senders:
1 messages sent by:
root (uid=0):


SASL Authenticated messages from:
unknown[13.9.18.11]: 2 Time(s)


Connections lost:
Connection lost while CONNECT : 1 Time(s)

---------------------- postfix End -------------------------


--------------------- SSHD Begin ------------------------


Users logging in through sshd:
admin:
13.9.18.15: 2 times
14.7.13.19: 1 time

---------------------- SSHD End -------------------------


--------------------- Disk Space Begin ------------------------

Filesystem Size Used Avail Use% Mounted on
/dev/mapper/Ubuntu-root 227G 33G 183G 15% /
/dev/sdb1 367G 36G 313G 11% /mnt
/dev/sda5 228M 24M 193M 11% /boot


---------------------- Disk Space End -------------------------


###################### LogWatch End #########################


As you can see the report is well structured and provides relevant information about SMTP/POP services, Web statistics and access security. It even reports that someone is proving the server and that a known vulnerability has been tested on my server... now I can take actions like blocking that IP address from all access to the server using iptables.

From looking at the thousand of megabytes of log files it would have been a little difficult to spot this particular security treat.