A very inspirational talk by Dr. Randy Paush.
Saturday, February 23, 2008
Friday, February 22, 2008
Reduce GIF size using RMagick
If you are creating GIF images using RMagick and your application has very stringent size restrictions (i.e. mobile devices) then this post may help you get the most of RMagick.
While it is possible to control the compression of JPEG and PNG files using the quality parameter for GIF files we are left with almost no options. Fortunately a little understanding of the default, and only, compression scheme used in GIF can help you improve the compression performance of your images.
The LZW compression algorithm used in GIF images and developed by Abraham Lempel, Jakob Ziv and Terry Welch, contructs a color table for an image wherein each color value is matched to a pixel. Thus, images with large areas of one color will be compressed far better than those that those that do not have such color blocks.
So to get better compression (smaller images) we must ensure we have large contiguous blocks of the same color in our image. When creating images in ImageMagick we can use these tips to ensure small size results:
First: Make use simple graphics with flat colors (i.e. avoid using Magick::GradientFill).
Second: when using an RMagick::Draw object always make sure you call the stroke_antialias(false) method on it:
1 require "RMagick"
2
3 gc = Magick::Draw.new
4 gc.stroke_antialias(false)
5
6 # your drawing code below
Third: When writing text using the annotate method from the Magick::Draw or Magick::Image classes do not use text antialiasing:
1 require "RMagick"
2
3 gc = Magick::Draw.new
4
5 gc.annotate(img,...) {
6 self.text_antialias = false
7 }
A very simple method to reduce the image size is using the despeckle filter on the image. This will reduce the color dither making the color distribution more planar so we have larger portions of the image with the same color. By doing this the LZW algorithm can reduce the final image size up to a 20% of the original size depending on the image.
1 require "RMagick"
2
3 small_image = big_image.despeckle
4 small_image.write("small_image.gif"){
5 self.compression = Magick::LZWCompression
6 self.dither = false
7 }
Actually calling self.compression is not needed as it is set by default by RMagick but is good just to make sure.
Resources
http://rmagick.rubyforge.org/
http://www.faqs.org/faqs/jpeg-faq/part1/section-9.html
http://rmagick.rubyforge.org/src_over.html
http://www.webdevelopersnotes.com/graphics/gifs_compression_algorithm.php3
Monday, February 18, 2008
Using ActiveRecord with Microsoft SQL Server (MSSQL)
There seems to be a lot of confusion on how to use ActiveRecord from Ruby on Rails to query a MSSQL (Microsoft SQL) Database. During my last two projects I had to research this topic and found that this confusion stems from the fact that the documentation is sparced all over the web and most of the time it is incomplete and misleading.
After some tests and real projects I found there are mainly two ways to get ActiveRecord working with a MSSQL Database server: (1) Using the ADO driver and (2) using an ODBC driver. How these methods are used differ if we are in a Windows client or in a Linux client so we get a total of four different ways to connect ActiveRecord to MSSQL, in fact I only got three as we will see later, but in theory there can be four if I get ADO to work in Linux.
The confusion most people new to this topic confront is that the documentation found in the web usually mention these methods separately and without much detail on the configuration. For example some pages in the web explain how to connect to MSSQL using the ADO driver but they don't mention that this works only if you are using a Windows client where win32ole can be installed. Some others talk about success using ODBC and present the configuration but do not explain how to create the DSN needed for connection because they assume this is common knowledge (it was not for me).
To avoid the pain I had to suffer when getting my work done to others, here I present my experiences in this topic in four subsections. Each one explains how to use the ADO or ODBC methods from a Windows or Linux client.
Windows Client using ADO driver
I have tested this configuration using a WinXP Home client with the ruby one click installer (184-20 and 186-26) connecting to a Windows Server 2003 running Microsoft SQL Enterprise 2000 SP3.
To start download an extract the ruby-dbi package (dbi-0.1.1.tar.gz) somewhere in your Windows machine.
The following instructions are to be executed from within a command shell (cmd.exe).
1 gem update --system
2 gem install activerecord-sqlserver-adapter --source=http://gems.rubyonrails.org
3 mkdir c:\ruby\lib\ruby\site_ruby\1.8\DBD\ADO
4 copy ruby-dbi\lib\dbd\ADO.rb c:\ruby\lib\ruby\site_ruby\1.8\DBD\ADO
These commands simply update the RubyGems system and install the Active Record gem with all dependencies needed to connect to MSSQL. We then copy the ADO driver from ruby-dbi inside our ruby install directory. If you have ruby installed in a place other than "c:\ruby" make the appropiate changes to the commands above.
Now in your code you can connect to the MSSQL database using the following:
1 ActiveRecord::Base.establish_connection(
2 :adapter => "sqlserver",
3 :mode => "ADO",
4 :username => "youruser",
5 :password => "yourpass",
6 :host => "serverhostname_or_ipaddress",
7 :database => "YourDbName"
8 )
I have tested this configuration with ActiveRecord version 1.14.4 and 2.0.2 but I assume this should work with all version in between too.
Windows Client using ODBC
I have only tested this with the latest ActiveRecord 2.0.2 so I don't know if this works with previous versions and using a WinXP Home client with the ruby one click installer (184-20 and 186-26) connecting to a Windows Server 2003 running Microsoft SQL Enterprise 2000 SP3
The following instructions are to be executed from within a command shell (cmd.exe).
1 gem update --system
2 gem install activerecord-sqlserver-adapter --source=http://gems.rubyonrails.org
As with the ADO driver these commands simply update the RubyGems system and install the ActiveRecord gem with all dependencies needed to connect to MSSQL.
The next step is where most documentation I have seen fails. They say you must specify a DSN to connect via ODBC but they do not mention what this DSN is or where to get it. I guess these gurus assume we must know this things or we would not be looking for this info but in my case it took me a while to figure out where this DSN thing is supposed to come from.
The DSN (Data Source Name) must be created and in Windows we do it by using a tool called "odbcad32.exe" or choosing "Data Sources (ODBC)" from the "Administrative Tools" inside Windows "Control Panel". For instructions on how to use this tool refer to the detailed explanation at www.truthsolutions.com.
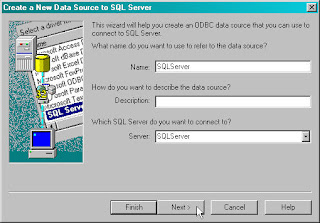
When creating the new DSN make note of the name you set on it (see figure above) because this is the name you must use to connect to the MSSQL server when using ActiveRecord. Also make sure you select the "SQL Server" driver as instructed at www.truthsolutions.com. The authentication method depends on how you have your MSSQL server configured but I always use the using Login and Password entered by the user option so I don't know about the network login ID option. At the end make sure you test the DSN to make sure it is valid and is working.
Once the DSN is created you can connect to the MSSQL server using ActiveRecord like:
1 ActiveRecord::Base.establish_connection(
2 :adapter => "sqlserver",
3 :mode => "odbc",
4 :username => "youruser",
5 :password => "yourpass",
6 :dsn => "SQLServer"
7 )
and make sure to replace "SQLServer" with the DSN name you set up when creating it using the "odbcad32.exe" tool.
Linux Client using ODBC
The following instructions were tested in Kubuntu Gusty (7.10) using the latest ActiveRecord 2.0.2 as client connecting to a Windows Server 2003 running Microsoft SQL Enterprise 2000 SP3.
From console install the following packages:
1 sudo aptitude install ruby1.8 unixodbc tdsodbc libodbc-ruby1.8 rubygems
Next you can choose to install ActiveRecord using Ubuntu repositories or using RubyGems repositories. I chose to use RubyGems as this provides the latest versions and is updated more often.
Now as in Windows we must create a DSN for unixODBC. The first step is to add the freeTDS driver to unixODBC and to to this we create a configuration file (simple text file) called for example "myodbcdriver.ini" that contains:
1 [FreeTDS]
2 Description = TDS driver (Sybase/MS SQL)
3 Driver = /usr/lib/odbc/libtdsodbc.so
4 Setup = /usr/lib/odbc/libtdsS.so
5 CPTimeout =
6 CPReuse =
If you are not using Kubuntu/Ubuntu then make sure you have installed unixODBC and the freeTDS ODBC driver and change the "Driver" and "Setup" paths to reflect your system installation. In Kubuntu the "tdsodbc" package we installed above provides us with this configuration file in "/usr/share/tdsodbc/odbcinst.ini" so we do not need to create it.
With this configuration we can add the freeTDS driver to unixODBC by issuing the following command:
1 sudo odbcinst -i -d -f myodbcdriver.ini
or in Kubuntu that provides the configuration file
1 sudo odbcinst -i -d -f /usr/share/tdsodbc/odbcinst.ini
Next we must create a DSN configuration file, say mydsn.ini, that looks like:
1 [SQLServer]
2 Driver = FreeTDS
3 Description = My First SQLServer Database
4 Trace = No
5 Server = hostname_or_ipaddress
6 Port = 1433
7 Database = SQLServerDB
As in Windows take note of the name you set to the DSN ([SQLServer]) as this is used for the connection. Finally we add the DSN to unixODBC with the following command:
1 odbcinst -i -s -f mydsn.ini -h
Note that we execute this command without the "sudo" because we are installing a User DSN that will be accessible only to the system user that installed the DSN. To install a system wide DSN we use a similar command but with the "-l" switch instead of the "-h".
1 odbcinst -i -s -f mydsn.ini -l
You can run the odbcinst command without any arguments to get a list of possible options. To test the newly created DSN we can use the isql command tool that comes with unixODBC:
1 isql SQLServer username password
replacing SQLServer with the name you used when creating the DSN and if everything is working you should get a message similar to:
1 +---------------------------------------+
2 | Connected! |
3 | |
4 | sql-statement |
5 | help [tablename] |
6 | quit |
7 | |
8 +---------------------------------------+
9 SQL>
input "quit" to exit the SQL prompt. As in Windows, once the DSN is created you can connect to the MSSQL server using ActiveRecord using:
1 ActiveRecord::Base.establish_connection(
2 :adapter => "sqlserver",
3 :mode => "odbc",
4 :username => "youruser",
5 :password => "yourpass",
6 :dsn => "SQLServer"
7 )
again make sure to replace "SQLServer" with the DSN name you set up when creating it.
Some notes about the Linux to MSSQL connection:
Linux Client using ADO driver
So far I have been unable to make this configuration work. It seems that the ADO driver uses some components from the win32ole library that is only available in Windows machines. This means the only way to connect to a MSSQL server from a Linux client is using the unixODBC/freeTDS driver method described before.
If someone knows of other ways to make Linux communicate with a MSSQL database please let me know.
Resources
http://softiesonrails.com/2006/6/28/activerecord-with-sqlserver-without-rails
http://www.imarichardson.com/
http://www.themolehill.com/
http://www.freetds.org/
http://www.unixodbc.org/
http://www.unixodbc.org/doc/FreeTDS2.html
http://www.truthsolutions.com/sql/odbc/creating_a_new_odbc_dsn.htm
http://josiah.ritchietribe.net/blog/archive/2006/01/1176/
After some tests and real projects I found there are mainly two ways to get ActiveRecord working with a MSSQL Database server: (1) Using the ADO driver and (2) using an ODBC driver. How these methods are used differ if we are in a Windows client or in a Linux client so we get a total of four different ways to connect ActiveRecord to MSSQL, in fact I only got three as we will see later, but in theory there can be four if I get ADO to work in Linux.
The confusion most people new to this topic confront is that the documentation found in the web usually mention these methods separately and without much detail on the configuration. For example some pages in the web explain how to connect to MSSQL using the ADO driver but they don't mention that this works only if you are using a Windows client where win32ole can be installed. Some others talk about success using ODBC and present the configuration but do not explain how to create the DSN needed for connection because they assume this is common knowledge (it was not for me).
To avoid the pain I had to suffer when getting my work done to others, here I present my experiences in this topic in four subsections. Each one explains how to use the ADO or ODBC methods from a Windows or Linux client.
Windows Client using ADO driver
I have tested this configuration using a WinXP Home client with the ruby one click installer (184-20 and 186-26) connecting to a Windows Server 2003 running Microsoft SQL Enterprise 2000 SP3.
To start download an extract the ruby-dbi package (dbi-0.1.1.tar.gz) somewhere in your Windows machine.
The following instructions are to be executed from within a command shell (cmd.exe).
1 gem update --system
2 gem install activerecord-sqlserver-adapter --source=http://gems.rubyonrails.org
3 mkdir c:\ruby\lib\ruby\site_ruby\1.8\DBD\ADO
4 copy ruby-dbi\lib\dbd\ADO.rb c:\ruby\lib\ruby\site_ruby\1.8\DBD\ADO
These commands simply update the RubyGems system and install the Active Record gem with all dependencies needed to connect to MSSQL. We then copy the ADO driver from ruby-dbi inside our ruby install directory. If you have ruby installed in a place other than "c:\ruby" make the appropiate changes to the commands above.
Now in your code you can connect to the MSSQL database using the following:
1 ActiveRecord::Base.establish_connection(
2 :adapter => "sqlserver",
3 :mode => "ADO",
4 :username => "youruser",
5 :password => "yourpass",
6 :host => "serverhostname_or_ipaddress",
7 :database => "YourDbName"
8 )
I have tested this configuration with ActiveRecord version 1.14.4 and 2.0.2 but I assume this should work with all version in between too.
Windows Client using ODBC
I have only tested this with the latest ActiveRecord 2.0.2 so I don't know if this works with previous versions and using a WinXP Home client with the ruby one click installer (184-20 and 186-26) connecting to a Windows Server 2003 running Microsoft SQL Enterprise 2000 SP3
The following instructions are to be executed from within a command shell (cmd.exe).
1 gem update --system
2 gem install activerecord-sqlserver-adapter --source=http://gems.rubyonrails.org
As with the ADO driver these commands simply update the RubyGems system and install the ActiveRecord gem with all dependencies needed to connect to MSSQL.
The next step is where most documentation I have seen fails. They say you must specify a DSN to connect via ODBC but they do not mention what this DSN is or where to get it. I guess these gurus assume we must know this things or we would not be looking for this info but in my case it took me a while to figure out where this DSN thing is supposed to come from.
The DSN (Data Source Name) must be created and in Windows we do it by using a tool called "odbcad32.exe" or choosing "Data Sources (ODBC)" from the "Administrative Tools" inside Windows "Control Panel". For instructions on how to use this tool refer to the detailed explanation at www.truthsolutions.com.

When creating the new DSN make note of the name you set on it (see figure above) because this is the name you must use to connect to the MSSQL server when using ActiveRecord. Also make sure you select the "SQL Server" driver as instructed at www.truthsolutions.com. The authentication method depends on how you have your MSSQL server configured but I always use the using Login and Password entered by the user option so I don't know about the network login ID option. At the end make sure you test the DSN to make sure it is valid and is working.
Once the DSN is created you can connect to the MSSQL server using ActiveRecord like:
1 ActiveRecord::Base.establish_connection(
2 :adapter => "sqlserver",
3 :mode => "odbc",
4 :username => "youruser",
5 :password => "yourpass",
6 :dsn => "SQLServer"
7 )
and make sure to replace "SQLServer" with the DSN name you set up when creating it using the "odbcad32.exe" tool.
Linux Client using ODBC
The following instructions were tested in Kubuntu Gusty (7.10) using the latest ActiveRecord 2.0.2 as client connecting to a Windows Server 2003 running Microsoft SQL Enterprise 2000 SP3.
From console install the following packages:
1 sudo aptitude install ruby1.8 unixodbc tdsodbc libodbc-ruby1.8 rubygems
Next you can choose to install ActiveRecord using Ubuntu repositories or using RubyGems repositories. I chose to use RubyGems as this provides the latest versions and is updated more often.
Now as in Windows we must create a DSN for unixODBC. The first step is to add the freeTDS driver to unixODBC and to to this we create a configuration file (simple text file) called for example "myodbcdriver.ini" that contains:
1 [FreeTDS]
2 Description = TDS driver (Sybase/MS SQL)
3 Driver = /usr/lib/odbc/libtdsodbc.so
4 Setup = /usr/lib/odbc/libtdsS.so
5 CPTimeout =
6 CPReuse =
If you are not using Kubuntu/Ubuntu then make sure you have installed unixODBC and the freeTDS ODBC driver and change the "Driver" and "Setup" paths to reflect your system installation. In Kubuntu the "tdsodbc" package we installed above provides us with this configuration file in "/usr/share/tdsodbc/odbcinst.ini" so we do not need to create it.
With this configuration we can add the freeTDS driver to unixODBC by issuing the following command:
1 sudo odbcinst -i -d -f myodbcdriver.ini
or in Kubuntu that provides the configuration file
1 sudo odbcinst -i -d -f /usr/share/tdsodbc/odbcinst.ini
Next we must create a DSN configuration file, say mydsn.ini, that looks like:
1 [SQLServer]
2 Driver = FreeTDS
3 Description = My First SQLServer Database
4 Trace = No
5 Server = hostname_or_ipaddress
6 Port = 1433
7 Database = SQLServerDB
As in Windows take note of the name you set to the DSN ([SQLServer]) as this is used for the connection. Finally we add the DSN to unixODBC with the following command:
1 odbcinst -i -s -f mydsn.ini -h
Note that we execute this command without the "sudo" because we are installing a User DSN that will be accessible only to the system user that installed the DSN. To install a system wide DSN we use a similar command but with the "-l" switch instead of the "-h".
1 odbcinst -i -s -f mydsn.ini -l
You can run the odbcinst command without any arguments to get a list of possible options. To test the newly created DSN we can use the isql command tool that comes with unixODBC:
1 isql SQLServer username password
replacing SQLServer with the name you used when creating the DSN and if everything is working you should get a message similar to:
1 +---------------------------------------+
2 | Connected! |
3 | |
4 | sql-statement |
5 | help [tablename] |
6 | quit |
7 | |
8 +---------------------------------------+
9 SQL>
input "quit" to exit the SQL prompt. As in Windows, once the DSN is created you can connect to the MSSQL server using ActiveRecord using:
1 ActiveRecord::Base.establish_connection(
2 :adapter => "sqlserver",
3 :mode => "odbc",
4 :username => "youruser",
5 :password => "yourpass",
6 :dsn => "SQLServer"
7 )
again make sure to replace "SQLServer" with the DSN name you set up when creating it.

Some notes about the Linux to MSSQL connection:
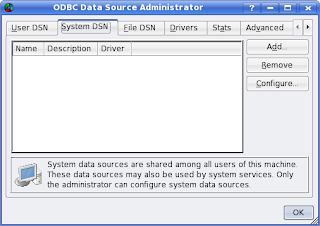
- There are GUI based tools similar to "odbcad32.exe" in Windows that allows you to manage DSN's and ODBC drivers more easily. In Kubuntu simply install the "unixodbc-bin" package and then execute "OBDCConfig". As you can se from the image above this tool is quite similar to the Windows counterpart.
- The freeTDS driver is free and even thought it is rather stable I have found some small issues specially when working with non-ascii character sets like SJIS and ISO-2022-JP used in Japanese OSes. There is a commercial alternative driver produced by EasySoft in case you need commercial support and reliability.
- There is another implementation of ODBC in Linux called iODBC but have never used it. It may be interesting to test the Windows ODBC, unixODBC and iODBC in performance.
Linux Client using ADO driver
So far I have been unable to make this configuration work. It seems that the ADO driver uses some components from the win32ole library that is only available in Windows machines. This means the only way to connect to a MSSQL server from a Linux client is using the unixODBC/freeTDS driver method described before.
If someone knows of other ways to make Linux communicate with a MSSQL database please let me know.
Resources
http://softiesonrails.com/2006/6/28/activerecord-with-sqlserver-without-rails
http://www.imarichardson.com/
http://www.themolehill.com/
http://www.freetds.org/
http://www.unixodbc.org/
http://www.unixodbc.org/doc/FreeTDS2.html
http://www.truthsolutions.com/sql/odbc/creating_a_new_odbc_dsn.htm
http://josiah.ritchietribe.net/blog/archive/2006/01/1176/
RubyGems Explicit Versioning
One of the most useful features of RubyGems as a package manager is the ability to force explicit versions of the packages in your ruby code. Unfortunately worst than not being documented this feature is wrongly documented even in RubyGems own manual pages.
So for the record here is how to tell your ruby code to use a specific gem version:
For RubyGems version < 0.9.4 we use:
1 require 'rubygems'
2 require_gem 'mechanize','=0.4.7'
3 require 'mechanize'
What we do is call "require_gem" to set up the version we want and then load the gem using "require".
After RubyGems 0.9.4 onwards the "Kernel#require_gem" method was deprecated and replaced with "Kernel#gem". So if you have the latest RubyGems the code above becomes:
1 require 'rubygems'
2 gem 'mechanize','=0.4.7'
3 require 'mechanize'
Instead of using "=0.4.7" it is also possible to use "<0.4.7" or ">0.4.7" if the specific version is not required.
We can be more professional and make our scripts handle both cases above using the Gem::RubyGemsVersion constant:
1 require 'rubygems'
2 if Gem::RubyGemsVersion < "0.9.4"
3 require_gem 'mechanize','=0.4.7'
4 else
5 gem 'mechanize','=0.4.7'
6 end
7 require 'mechanize'
This way our code will (hopefully) work with all versions of RubyGems.
References:
http://redhanded.hobix.com/inspect/autorequireIsBasicallyGoneEveryone.html
http://piao-tech.blogspot.com/2006/11/tips-on-rubygems-installation-and.html
Tuesday, February 12, 2008
Per user Latex style and bst files
Easy way to tell latex where to look for custom sty, cls and bst files:
1 # The double slash at the end means recursive.
2 export BSTINPUTS=.:~/.latex//:
3 export BIBINPUTS=.:~/.latex//:
4 export TEXINPUTS=.:~/.latex//:
Change the path to reflect your system and make sure to include the current dir "." in the list of paths or latex won't be able to find the tex files in the current directory.
Subscribe to:
Posts (Atom)