This setup is of a
subversion server running on Linux (Kubuntu 8.04) and subversion clients (
Tortoise SVN) running in Windows (WinXP).
Pre-requisitesI assume you already have a subversion repository working and now you want to access it using ssh tunnelling for security reasons. Also the server must have remote ssh access and be configured to do Private Key authentication.
Setting up PuttyThe best SSH client and related tools for Windows are the PuTTY family of programs that can be found at
http://www.chiark.greenend.org.uk/~sgtatham/putty/. You can download the individual ".exe" files an put them in your path but I recommend you to use the
installer that will install all the tools and set them nicely in your start menu.
Create public/private key pair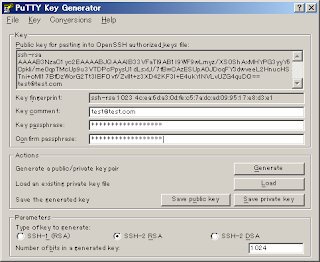 Objective
To access the subversion server via ssh you need a public/private key pair. To generate these key pair you can use the PuTTY Key Generator (PuTTYgen.exe) that was installed along with PuTTY installer.
Simply execute the PuTTYgen.exe program and press the "generate" button. After that keep moving your mouse, to generate some randomness, until the progress bar reaches the end. At this point you will get your public and private keys generated.
Make sure you add a "Key passphrase" that will be like a password to access the keys. The comment part is not necessary but is customary to put your email address.
Also make sure you are generating a SSH-2 key pair as SSH-1 is not secure. Choosing between RSA or DSA keys is a matter of application. It is known that DSA is fast at key generation and signing while RSA is faster at verification. So if your application requires a lot of signing (i.e. SSL Web Application) then DSA is good but if your application requires a lot of verifying (i.e. Subversion) then RSA is best. Since we are going to use this key for Subversion I recommend subversion but you are free to use the one you prefer.
Now we need to save your generated keys somewhere in your hard disk. The public key is visible in the PuTTYgen application widget (i.e. the long sequence of letters in the top text box). This key starts usually with "ssh-rsa" or "ssh-dsa" depending on what type of key you generated (RSA or DSA).
To save your public key on disk do not use the "save public key" button as this will generate a key in a format that is not compatible with OpenSSH. Simply copy and paste the key from the text box to a file on disk. You can save this file with whatever name you like but I recommend putting a ".pub" extension just as OpenSSH does.
The private key you must save it using the "save private key" button as this generates a file with ".ppk" extension that is understood only by PuTTY programs. Make sure you put the same name as the public key but with the ".ppk" extension instead of ".pub".
As an additional step if you would like to use your private key with other applications like SftpDrive so these can also connect to the OpenSSH server without need for a password, then you must convert your private key (.ppk file) to the OpenSSH key format. To do this simply select "Conversions" in the PuTTYgen.exe menu and then "Export OpenSSH key" to generate a key that can be used with OpenSSH compatible applications.
Note that with PuTTYgen.exe you can convert your private keys between PuTTY (.ppk) format and OpenSSH format so if you generate your public/private keys using OpenSSH ssh-keygen program you can use them in PuTTY by importing the private key using PuTTYgen.
Setting your public keysThe way the public/private key pair are used is simple. You keep the private key in your local machine usually in a key manager like ssh-agent or pageant and send your public key to all the servers you want to access via ssh.
To set up your public key in the SSH server (assumed OpenSSH server) simply log to the server shell using your account username and password (if you don't have one ask you administrator or if you are the administrator create one yourself). Then copy the contents of your public key file inside the file "~/.ssh/authorized_keys2".
To do this edit the "~/.ssh/authorized_keys2" file with any text editor (Vi, Nano, Kwrite, gEdit) and make sure it looks like in the next figure:
The key must start with ssh-rsa or ssh-dsa depending on the key you generated followed by the key all in one line (i.e. no new lines and spaces) and finally the comment again all in one line.
Finally make sure the authorized_keys2 file has correct permissions by executing "chmod 600 authorized_keys2".
You can set the public key in as many SSH servers as you like so you can access them all using the same private key.
Setting your private keyYour private key must be your most guarded secret and shall not be passed to anyone. Only you should have access to this key because anyone who gets his/her hands on that private key can access all the servers where you installed your public key and we don't want anyone to have that access power do we?
To use a your private key we usually use a SSH authentication agent like ssh-agent in Linux/Unix or pageant in Windows. The PuTTY installer comes with pageant.exe that is the one I use and recommend.
Simply execute pageant.exe from the application menu and a small icon will appear in your system tray. Right click the icon and select "Add key" on the context menu, then browse the directory where you saved your private key (i.e.
.ppk) and select it. And that is it....
Testing SSH access
To test open the PuTTY.exe SSH client and create a new session to connect to your SSH server (make sure you save the session). When you open the session it should log you in without asking for any username and passwords. If it asks you for username and password then you did something wrong. Make sure the publickey format is correct on the server and that the private key is set in pageant. Of course make sure the OpenSSH server is running on the remote machine and that pageant is running on the local machine.
Once you can connect to the SSH server without need for a username and password then we can proceed to set up TortoiseSVN to access your Subversion repositories via SSH tunnels.
Setting TortoiseSVN with SSH tunnelling
Once you have SSH set to work with public/private key authentication and have pageant configured configuring TortoiseSVN is a breeze. All you have to do is make sure you use the correct URL format to access the repository.
If you have TortoiseSVN installed try to make a checkout and in the URL put something like:
svn+ssh://username@hostname/dir/to/repo
And you should be able to ckeck out that project over an SSH tunnel. You don't even need to have svnserve running on the server as the svn+ssh scheme tells the TortoiseSVN to start it for you and tunnel it over SSH.
Of course replace username with the username you use to access the SSH server and hostname with the IP address or FQDN of your SSH server. The path to the repository must be absolute path starting from the root "/" directory and have correct access privileges (read/write) for the username you use.
Resources
http://neubia.com/archives/000191.html
http://www.unixwiz.net/techtips/putty-openssh.html


