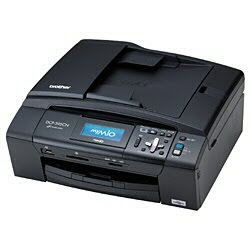
This little machine is a printer, scanner and copy machine all in one. It has USB and ethernet ports but even better a wireless 802.11a/b/g port. This means I can have the printer anywhere in the house and print from my desktop or lapton freely. In Japan it costs around ¥15,000 (USD 150) that is pretty cheap for all the features packaged in.
And the most important thing for me is that is 100% compatible with linux (Kubuntu). Here I will show the steps to get this little beast working with my Kubuntu machine.
Prerequisites
I use the wireless interface to connect to the printer/scanner so before you follow these instructions make sure the printer has an IP configured. The wireless configuration is done using the printer control panel and is already covered in the printer manual so I will skip it.
You may ping the printer IP address to check that you can reach it from your computer. If you cannot ping it then it is not well configured or you have problems with your LAN network.
Installation
These instructions are based on the Brother solution page instructions.
First we need to download both the LPR driver and the CUPS wrapper driver by going to the following URLs. Inside you will find RPM and DEB packages for the different printer models.
If you have the same printer as me (DCP-595CN) then look for the DEB packages of this printer and click the link. You will be directed to a GPL license page where you must agree to the GPL terms (Left Button) after which the download will start.
Once the DEB packages are downloaded we install them using the following commands:
sudo mkdir /usr/share/cups/model
sudo mkdir /var/spool/lpd
sudo mkdir -p /usr/lib/cups/filter
sudo dpkg -i dcp595cnlpr-1.1.2-1.i386.deb
sudo dpkg -i dcp595cncupswrapper-1.1.2-2.i386.deb
sudo dpkg --force-arquitecture -i dcp595cnlpr-1.1.2-1.i386.deb
sudo dpkg --force-arquitecture -i dcp595cncupswrapper-1.1.2-2.i386.deb
sudo dpkg --force-arquitecture -i dcp595cncupswrapper-1.1.2-2.i386.deb
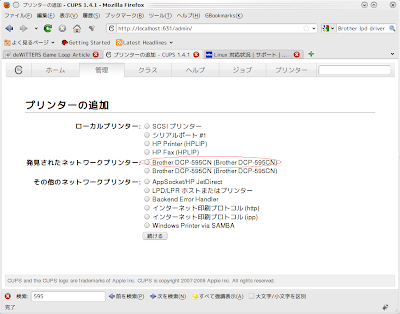
Now with the drivers installed we can use the CUPS administration page to add the printer. To do this we open our favorite Internet browser and access the following URL: http://localhost:631.
Enter the printer administration tab and add a new printer. If your printer is already configured with an IP address in your LAN it should appear in the list of detected printers (see screenshot below):

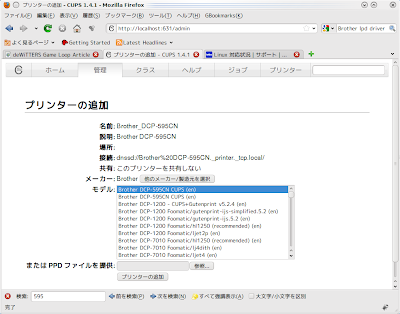
Select the printer and in the next window you will be asked to add some details about the printer like the place, description and name. You may add anything you like or leave the defaults and go to the next screen.
In the next screen (see screenshot below) we select the printer driver to use. If you installed the DEB packages correctly then the correct driver should be selected here by default:

Simply press the "add printer" button to finish. Now your printer should be ready for printing. Go ahead the print something.
Brother DCP-595CN Scanner In Ubuntu/Kubuntu
Getting the scanner working in Kubuntu is even easier. First we need to download the SANE driver from Brothers home page. Which driver to download depends on the scanner model you have. In my case (DCP-595CN) I need the brscan3 driver. There are 32 and 64bit versions and RPM and DEB packages. For my configuration I need the brscan3 32bit DEB pacakge. Download the package for your configuration and install it using this command:
sudo aptitude install xsane sane-utils brscan3-0.2.8-1.i386.deb
In the command above I am installing some SANE packages and the brscan3 driver. Next we need to configure the scanner with the following command:
sudo brsaneconfig3 -a name=DCP-595CN model=DCP-595CN ip=192.168.11.4
Depending on the driver you installed the configuration command changes. For brscan3 we use the "brsaneconfig3" command. The name can be anything you want as long as it has no white spaces but the model and the ip must be set to the correct values. The ip of course is the IP address the printer has configured and the model is the model name of the printer. If you are not sure about the model or IP you can use the following command to query the network:
sudo brsaneconfig3 -q
This command gives a list of supported models and at the end a list of detected scanners. In my configuration at the end I get:
Devices on network
0 DCP-595CN           "DCP-595CN"         I:192.168.11.4
If you do not see this list then your machine is not able to reach the scanner on the IP level so make sure it has the IP address configured and that you can ping it.
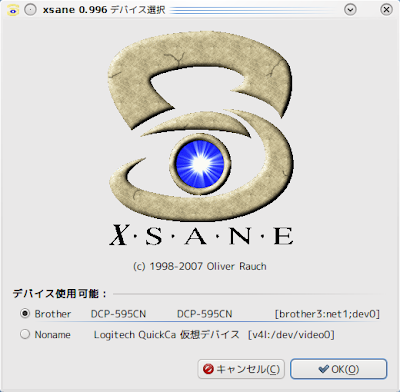
After you have configured the scanner with the brscanconfig3 tool you are ready to scan. To test it you can run xsane and the scanner should be listed like in the screenshot below:

Select the scanner and scan something. Now you have a fully functional printer, scanner and copy machine in you Kubuntu installation.
No comments:
Post a Comment