Of course Netbeans enthusiasts developed a plugin (Undroid) but it is not supported by Google, I could not get it to launch the emulator directly from the IDE and currently it does not work with the latest Android SDK so still we do not have a full solution for Android development in Netbeans.
Now if you don't mind working in a mixed setting using Android tools from command line and using Netbeans to code, compile and install your Android applications then here is how you can do it.
Prerequisites
I assume you have the latest Netbeans 6.0.1 already installed and the latest Android SDK m5-rc14 also installed in your computer. I have tested this configuration in my Linux (Kubuntu) machine but should also work in Windows and other Linux distributions.
Creating a new project
The first thing is to create a new project using the activityCreator.py script that comes with the Android SDK:
activityCreator.py --out HelloAndroid org.piaotech.android
this script will create the project skeleton and more important the build.xml file that can be used by Netbeans to build/install your Android applications.

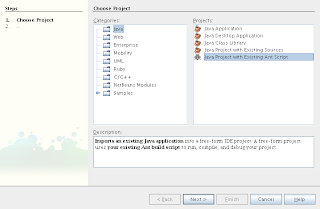
Start Netbeans and create a new "Java Project with Existing Ant Script" as shown in the figure above. In the next screen browse the location of the project directory created by the activityCreator.py script (HelloAndroid above) and the rest of the fields will be filled automatically by Netbeans. You can change the project name if you wish but the default is ok.

In the next screen (figure above) select the Ant tasks that each of the Netbeans commands should execute. I simply put compile for Build Project and install for Run Project.

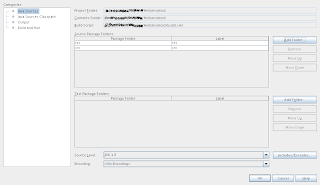
In the last screen make sure to add the src and res of the project to the Source Package Folders as shown above.

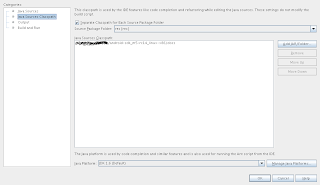
finally select Java Sources Classpath in categories and add the doc directory that is inside the Android SDK as shown in the picture above and press finish.
Running you project
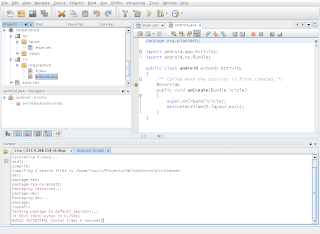
Now you should have your new Android project in Netbeans project view and now you can code and build it as you would using any other Netbeans project. Now if you try to run the application you will get an error indicating that there is no device. This is because I still have not found a way to launch the emulator from within Netbeans so we must launch it manually. From the command line run the emulator:
android-sdk_m5-rc14_linux-x86/tools/emulator
now with the emulator running if you run your project from within Netbeans the Android application will be automatically installed in the emulator.

It takes some effort to setup an Android project in Netbeans and actually there is no benefit from doing this as any java editor with support for Ant scripts can do the same. In my case is simply a matter of preference as all my Java projects are in Netbeans I did not want to have a separate project format only for Android applications.
Note that there is no need to close the emulator each time you rebuild your application so leave it running during the time you are developing. I also recommend you set up a console running the adb logcat command so you can see all the debugging messages (Log.v()) that Android throws.
No comments:
Post a Comment